When something goes wrong: if this, then that
Answers: something did not happen, what do I check? a switch says Not sent, what now? the customer says they got nothing? no blue Save button appeared? the task was gone before I marked it complete?
Every situation we met in testing, what it means, and the fix, click by click. Start with the newest note on the customer's contact profile; it usually says what happened.
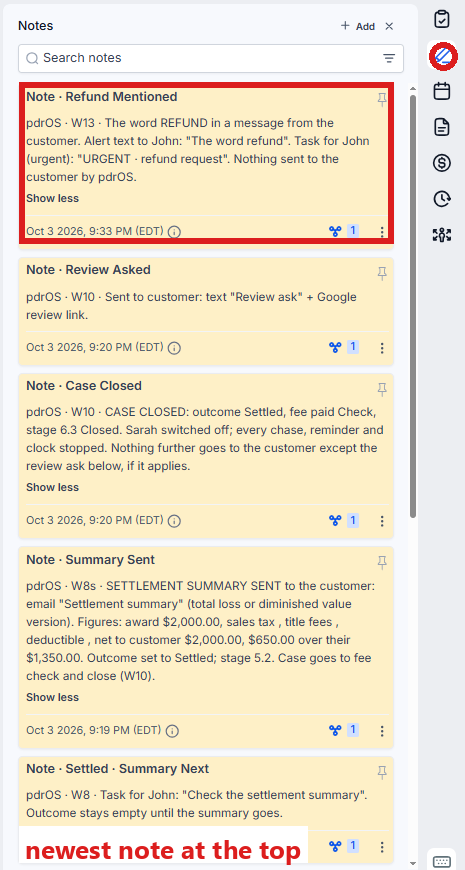
First: read the newest note
- In the left menu, click Contacts.
- Click in the search box at the top of the list and type the customer's last name or RO number (your case number).
- Click the customer's name in the list. Their contact profile opens. You are in the right place when you see the customer's name at the top left and their texts in the middle.
- On the far right edge of the contact profile, click the Notes icon (it looks like a pen; hold the mouse over the icons to see their names). The notes open beside it, newest at the top.
- Read the top note.
Saving
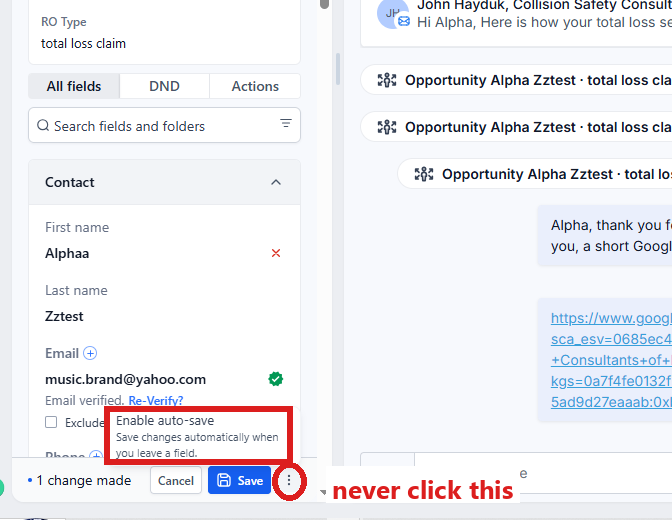
If you change a field and no blue Save button appears at the bottom of the left side, then stop and tell us. Auto-Save has been switched on, and we switch it back. Until then pick Send switches carefully: they go the moment you choose. Never click Enable auto-save (it is under the three dots next to the blue Save button).
If you changed a field and nothing happened, then check that you clicked the blue Save button at the bottom of the left side. It appears as soon as you change a field. Nothing happens and nothing is sent until you click it.
Tasks
If a task is already gone when you come back to mark it complete, then pdrOS closed it because the step happened. Nothing to do. Only three tasks close themselves today: ⚠️ Demand not sent, ⚠️ Our report not sent and ⚠️ Counteroffer not sent (they close when the email finally goes). Every other task waits for you. Do the step, then:
- In the left menu, click Tasks. My Tasks opens. You are in the right place when you see the boxes Overdue, Due Today, This Week and Completed at the top.
- Click the task's row. A short preview opens under it.
- Click Open Full View.
- Click the green Mark Complete button at the bottom right of the full view.
- Click Close to go back to the list.
Sending
If a switch reads "Not sent (see task)", then a field it needs is empty or wrong. The task names it: ⚠️ Demand not sent, ⚠️ Our report not sent, ⚠️ Counteroffer not sent, or, for Send range and Send summary, A Send switch could not act.
- In the left menu, click Tasks. My Tasks opens. You are in the right place when you see the boxes Overdue, Due Today, This Week and Completed at the top.
- Click that task's row. A short preview opens under it.
- Click Open Full View. Read which field is missing.
- Click the link under WHERE. The customer's contact profile opens in a new browser tab. You are in the right place when you see the customer's name at the top left and their texts in the middle.
- On the left side, click in the search box at the top (it reads Search fields and folders) and type the missing field's name. The table below says which folder each one is in.
- Fill the field. An amount: click in the box and type it (numbers only, no dollar sign). An email: click in the box and type it. A PDF: click Click to upload in the field, pick the PDF on your computer and click Open.
- Click the blue Save button at the bottom of the left side.
- Wait one minute.
- Click in the search box at the top of the left side and delete what is there.
- Type the switch's name (for example Send demand).
- Click the box under the switch and pick Send it now.
- Click the blue Save button at the bottom of the left side.
The three ⚠️ tasks close themselves when the email goes. A Send switch could not act does not: go back to the Tasks page and click Mark Complete.
Where the fields the tasks name are. Arrows mean: click this, then this.
| The task names | Where |
|---|---|
| RTA or demand PDF | Contacts → the customer → folder CASE → RTA or demand PDF |
| The signed agreement | folder CASE → Agreement signed date (empty means the customer has not signed; send them their agreement link again) |
| Claim # | Contacts → the customer → folder Insurance Info → Claim # |
| Date of Loss | Contacts → the customer → folder FORM | Repair Authorization → Date of Loss |
| Adjuster email | Contacts → the customer → folder CARRIER & APPRAISER → Adjuster email (the adjuster's name only prints in the demand email; fill it before Send demand) |
| Other appraiser email | Contacts → the customer → folder CARRIER & APPRAISER → Other appraiser email |
| Your report | Contacts → the customer → folder Estimates → Upload Estimate Doc Here |
| Counteroffer, Their number, My number | Contacts → the customer → folder CARRIER & APPRAISER → Counteroffer, Their number or My number |
If a switch still reads "Send it now" after five minutes and your phone got "…It did not go", then pdrOS missed your choice. This happens when you pick Send it now again within seconds of a Not sent. On a closed case, switches do nothing; tell us (in the left menu, click Support, then the orange Support Ticket button). Otherwise:
- In the left menu, click Contacts.
- Click in the search box at the top of the list and type the customer's last name or RO number.
- Click the customer's name in the list. Their contact profile opens. You are in the right place when you see the customer's name at the top left and their texts in the middle.
- On the left side of the contact profile, scroll down to the folder CASE and click the folder's name to open it.
- Look at the top of the folder and find the switch that reads Send it now.
- Click the box under the switch and pick Not sent (see task). Never pick I sent it myself here: that one records a send you made by hand.
- Click the blue Save button at the bottom of the left side.
- Wait one minute.
- Click the box under the switch again and pick Send it now.
- Click the blue Save button at the bottom of the left side.
- In the left menu, click Tasks. My Tasks opens. You are in the right place when you see the boxes Overdue, Due Today, This Week and Completed at the top.
- Click the row of the task A Send switch did not go · NAME. A short preview opens under it.
- Click Open Full View.
- Click the green Mark Complete button at the bottom right of the full view.
If the note says "skipped: the same email went out less than 10 minutes ago", then nothing is wrong; it would have been a duplicate. Wait ten minutes if you really need a second copy.
If the demand is refused with "it already went on [date]", then you are sending a second RTA. To send a corrected one:
- In the left menu, click Contacts.
- Click in the search box at the top of the list and type the customer's last name or RO number.
- Click the customer's name in the list. Their contact profile opens. You are in the right place when you see the customer's name at the top left and their texts in the middle.
- On the left side of the contact profile, scroll down to the folder CARRIER & APPRAISER and click the folder's name to open it.
- Find RTA or demand sent date.
- Click in the box under it. If a small x shows at its right end, click it; otherwise select the date and press the Delete key until the box is empty.
- Click the blue Save button at the bottom of the left side.
- Scroll up to the folder CASE and click the folder's name to open it.
- If the RTA itself did not change, go to step 13.
- In RTA or demand PDF, click the trash can icon to the right of the old file's name to remove it. Every file left there goes with the email.
- Click Click to upload, pick the corrected PDF and click Open.
- Click the blue Save button at the bottom of the left side.
- Wait one minute.
- At the top of the folder, click the box under Send demand and pick Send it now.
- Click the blue Save button at the bottom of the left side.
If the other side says they got nothing, then look at their own conversation: the sent email is there with the time.
- In the left menu, click Conversations.
- On the left is the list of people. Find the person's name and click it. If you cannot see it, type their name in the search box above the list.
- Their thread opens in the middle. You are in the right place when you see their name and the emails pdrOS sent them. The sent email is there with the time.
- To forward it, click the email to open it in full.
- Click the three dots at the top right of the email and pick Forward Email.
- Type their email address in the box for the address.
- Click the paper-plane button to send.
Or check their email address for a typo, fix it and send again:
- In the left menu, click Contacts.
- Click in the search box at the top of the list and type the customer's last name or RO number.
- Click the customer's name in the list. Their contact profile opens. You are in the right place when you see the customer's name at the top left and their texts in the middle.
- On the left side of the contact profile, scroll down to the folder CARRIER & APPRAISER and click the folder's name to open it.
- Read Adjuster email if the demand went missing (or a counter on a claimant case). Read Other appraiser email if your report went missing (or a counter on an insured case).
- If it is wrong, click in the box under it and delete the address.
- Type the right address.
- If it was the demand, also click in the box under RTA or demand sent date (same folder) and delete the date, so the box is empty.
- Click the blue Save button at the bottom of the left side.
- Wait one minute.
- Scroll up to the folder CASE and click the folder's name to open it.
- At the top of the folder, click the box under the switch that sent it and pick Send it now.
- Click the blue Save button at the bottom of the left side.
Opening a case
If your phone says "the intake for NAME did not finish", then the signup did not get its RO number within ten minutes. Tell us: in the left menu, click Support, then the orange Support Ticket button (see Getting help). Give the customer's name and write "the intake did not finish, please fix it and restart the intake". We do it on our side within the hour; the welcome and the first request go then.
If it says "…picked hail, a shop type, so nothing was sent", then the wrong type was picked.
- In the left menu, click Contacts.
- Click in the search box at the top of the list and type the customer's last name or RO number.
- Click the customer's name in the list. Their contact profile opens. You are in the right place when you see the customer's name at the top left and their texts in the middle.
- On the left side of the contact profile, scroll down to the folder REPAIR STATUS and click the folder's name to open it.
- Click the box under RO Type and pick the right appraisal type: total loss claim, diminished value, short pay or post-repair inspection.
- Click the blue Save button at the bottom of the left side.
- Tell us: in the left menu, click Support, then the orange Support Ticket button. Give the RO number and write "please restart the intake". We do it on our side within the hour.
If it says "submitted the signup on a closed case", then a past customer used their old link. If they have a new claim, send the plain signup link, alone in its own text.
- Open Your three links.
- Select the signup link with the mouse.
- Press Ctrl and C together to copy it (on a Mac, Cmd and C).
- In the left menu, click Contacts.
- Click in the search box at the top of the list and type the customer's last name or RO number.
- Click the customer's name in the list. Their contact profile opens. You are in the right place when you see the customer's name at the top left and their texts in the middle.
- At the bottom of the middle is the message box. At its left end, click the small button with a down arrow and pick SMS.
- Click in the box and press Ctrl and V together to paste the link (on a Mac, Cmd and V). Put nothing else in that text.
- Click the paper-plane button at the right end to send.
If the customer says they got no text after signup, then check the phone number. (If you left the consent box empty on purpose and set their DND to Text Messages, that customer is on email only and no text is expected.)
- In the left menu, click Contacts.
- Click in the search box at the top of the list and type the customer's last name or RO number.
- Click the customer's name in the list. Their contact profile opens. You are in the right place when you see the customer's name at the top left and their texts in the middle.
- Click in the search box at the top of the left side (it reads Search fields and folders) and type Phone.
- Read the number in the box under Phone.
- If it is wrong, click in that box and delete the old number.
- Type the right number.
- Click the blue Save button at the bottom of the left side.
- Tell us: in the left menu, click Support, then the orange Support Ticket button. Give the RO number and write "please restart the intake, the phone number was wrong". We do it on our side within the hour.
Two cases, one phone
If a customer with two cases texts and the message lands on the older case, then that is how texting works: one phone number, one contact profile. Until we move the number, every text from that customer lands on the older contact profile. If the older case is closed, Sarah is off there and nobody answers. Tell us the day the new case opens (in the left menu, click Support, then the orange Support Ticket button); we move the phone number to the new case.
Fields
If you cleared Their number by mistake, then no harm is done; the newest note says "cleared". Type it again:
- In the left menu, click Contacts.
- Click in the search box at the top of the list and type the customer's last name or RO number.
- Click the customer's name in the list. Their contact profile opens. You are in the right place when you see the customer's name at the top left and their texts in the middle.
- On the left side of the contact profile, scroll down to the folder CARRIER & APPRAISER and click the folder's name to open it.
- Click in the box under Their number and type the amount (numbers only, no dollar sign).
- Click the blue Save button at the bottom of the left side.
If you typed a wrong award, then correct Award amount before you send the summary. The customer does not get the settled message a second time.
- In the left menu, click Contacts.
- Click in the search box at the top of the list and type the customer's last name or RO number.
- Click the customer's name in the list. Their contact profile opens. You are in the right place when you see the customer's name at the top left and their texts in the middle.
- On the left side of the contact profile, scroll down to the folder OUTCOME and click the folder's name to open it.
- Click in the box under Award amount, delete the wrong amount and type the right one (numbers only, no dollar sign).
- Click the blue Save button at the bottom of the left side.
If you need a date changed (a sent date, a signed date), then pick the right day in its place. Only clearing a sent date lets a switch send again; other dates are records.
- In the left menu, click Contacts.
- Click in the search box at the top of the list and type the customer's last name or RO number.
- Click the customer's name in the list. Their contact profile opens. You are in the right place when you see the customer's name at the top left and their texts in the middle.
- On the left side, click in the search box at the top (it reads Search fields and folders) and type the date's name (for example Agreement signed date).
- Click the box under the date and pick the right day in the calendar that opens.
- Click the blue Save button at the bottom of the left side.
If nothing happened after an upload, then pdrOS may still be working, or the file is in the wrong field. Your report goes in Upload Estimate Doc Here (folder Estimates); their report goes in Supplement #1 Upload Doc Here (folder Supplements).
- Wait two minutes.
- In the left menu, click Contacts.
- Click in the search box at the top of the list and type the customer's last name or RO number.
- Click the customer's name in the list. Their contact profile opens. You are in the right place when you see the customer's name at the top left and their texts in the middle.
- On the far right edge of the contact profile, click the Notes icon (it looks like a pen; hold the mouse over the icons to see their names). The notes open beside it, newest at the top.
- Read the top note.
- Still nothing: on the left side, scroll down to the folder Estimates (your report) or Supplements (their report) and click the folder's name to open it.
- Look for the file's name in Upload Estimate Doc Here or Supplement #1 Upload Doc Here.
- If it is not there, click Click to upload in that field, pick the PDF on your computer and click Open.
- Click the blue Save button at the bottom of the left side.
If a customer's upload did nothing on an inspection, then that is right: an inspection does not wait for documents.
Messages
If a link broke in a text (only half of it is blue), then it was sent with words around it. Send the link again, alone in its own text. The agreement link is in folder FORM LINKS, field REPAIR AUTHORIZATION LINK. The upload link is in folder CARRIER & APPRAISER, field Appraisal Document Upload Link.
- In the left menu, click Contacts.
- Click in the search box at the top of the list and type the customer's last name or RO number.
- Click the customer's name in the list. Their contact profile opens. You are in the right place when you see the customer's name at the top left and their texts in the middle.
- On the left side of the contact profile, scroll down to the folder that holds the link and click the folder's name to open it.
- Click in the box that holds the link.
- Press Ctrl and A together to select the whole link (on a Mac, Cmd and A).
- Press Ctrl and C together to copy it. Do not type in the box; if a blue Save button appears, do not click it: click Cancel next to it.
- At the bottom of the middle is the message box. At its left end, click the small button with a down arrow and pick SMS.
- Click in the box and press Ctrl and V together to paste the link (on a Mac, Cmd and V). Put nothing else in that text.
- Click the paper-plane button at the right end to send.
If the customer says they did not get an email, then look in the middle of their contact profile. The email shows as sent, with the time. Ask them to check spam for mail from Collision Safety Consultants of PA.
- In the left menu, click Contacts.
- Click in the search box at the top of the list and type the customer's last name or RO number.
- Click the customer's name in the list. Their contact profile opens. You are in the right place when you see the customer's name at the top left and their texts in the middle.
- On the contact profile, scroll the middle to find the email. It shows as sent, with the time.
If Sarah said something odd, then reply yourself and tell us. Send us a screenshot (in the left menu, click Support, then the orange Support Ticket button, with the customer's name); we adjust her wording and switch her off for that customer if you ask.
- In the left menu, click Contacts.
- Click in the search box at the top of the list and type the customer's last name or RO number.
- Click the customer's name in the list. Their contact profile opens. You are in the right place when you see the customer's name at the top left and their texts in the middle.
- At the bottom of the middle is the message box. At its left end, click the small button with a down arrow and pick SMS for a text or Email for an email.
- Click in the box and type your reply.
- Click the paper-plane button at the right end to send.
If Sarah stopped answering a customer, then she handed over (she goes quiet for eight hours) or the case is closed. Answer yourself; if you want her back on sooner, tell us (in the left menu, click Support, then the orange Support Ticket button).
- In the left menu, click Contacts.
- Click in the search box at the top of the list and type the customer's last name or RO number.
- Click the customer's name in the list. Their contact profile opens. You are in the right place when you see the customer's name at the top left and their texts in the middle.
- At the bottom of the middle is the message box. At its left end, click the small button with a down arrow and pick SMS for a text or Email for an email.
- Click in the box and type your answer.
- Click the paper-plane button at the right end to send.
Booking
If someone booked with no case, then you got the alert; send them the signup link, or cancel the appointment.
To send the signup link:
- Open Your three links.
- Select the signup link with the mouse.
- Press Ctrl and C together to copy it (on a Mac, Cmd and C).
- In the left menu, click Contacts.
- Click in the search box at the top of the list and type the name from the alert.
- Click the name in the list. Their contact profile opens. You are in the right place when you see their name at the top left.
- At the bottom of the middle is the message box. At its left end, click the small button with a down arrow and pick SMS.
- Click in the box and press Ctrl and V together to paste the link (on a Mac, Cmd and V). Put nothing else in that text.
- Click the paper-plane button at the right end to send.
Or, to cancel the appointment:
- In the left menu, click Contacts.
- Click in the search box at the top of the list and type the name from the alert.
- Click the name in the list. Their contact profile opens. You are in the right place when you see their name at the top left.
- On the far right edge of the contact profile, click the Appointments icon (a calendar). You are in the right place when the panel's title reads Appointments.
- Click the three dots at the right of the appointment and pick Cancel.
Anything else
Send us the RO number and what you expected: in the left menu, click Support, then the orange Support Ticket button (Getting help). The notes on the contact profile tell us the rest.
Did this page not match what you see? Ask the support chat or open a support ticket. We change the page, not you.