Your first case, in order
Answers: what do I do first? what are the moves on a total loss, in order? where do I click for each move?
One total loss from signup to close is fourteen moves. Do them in this order. Each move says where to click, step by step, and links to the page with the detail.
Key: ⚡ = this field starts work. RTA = your demand for appraisal (right to appraisal) PDF. Claim # = the insurer's claim number. RO number = your case number.
Before you start
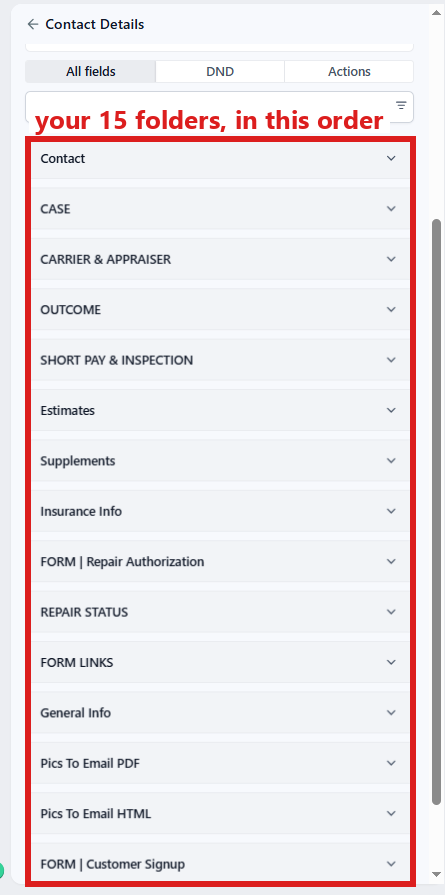
- Eleven of the moves happen on the customer's contact profile. Each one starts from the left menu (steps 1 to 3). When a task brought you to the move, you can click the link under WHERE in the task instead. The contact profile opens in a new browser tab.
- To open a folder, click its name. If you can already see its fields under the name, it is open: do not click it again (that closes it).
- After each folder, click the blue Save button at the bottom of the left side. Then go on to the next folder.
- When a move has a Send switch, it is always the last step. The five Send switches are at the top of folder CASE.
If you change a field and no blue Save button appears at the bottom of the left side, stop and tell us. Auto-Save has been switched on, and we switch it back. Until then pick Send switches carefully: they go the moment you choose. Never click Enable auto-save (it is under the three dots next to the blue Save button).
Move 1 · Sign the customer up
With the customer on the phone:
- Open your Signup bookmark (the signup link; see Your three links). The Appraisal Case Sign-Up Form opens.
- Fill the form as the customer talks. For Repair Order Type, pick total loss claim.
- Ask "OK to text you updates?"
- If they say yes, check the box I agree to receive text messages about my case from this office. Reply STOP to opt out. If they say no, leave it empty.
- Click Submit. You are done when the form says "Thank you. We have your case".
- If they said no, stop their texts straight away: in the left menu, click Contacts, click in the search box at the top of the list and type their last name, then click their name. At the top of the left side, click the DND tab (next to All fields) and check Text Messages. It saves by itself. Then tell us the RO number (in the left menu, click Support, then the orange Support Ticket button); we keep them on email only.
Detail: The signup form
Move 2 · Wait for the documents
The customer uploads; pdrOS chases. Wait for the task Documents in · value it. It appears on your Tasks page (in the left menu, click Tasks).
Detail: Step 1: the documents
Move 3 · Upload your report
- In the left menu, click Contacts.
- Click in the search box at the top of the list and type the customer's last name or RO number.
- Click the customer's name in the list. Their contact profile opens. You are in the right place when you see the customer's name at the top left and their texts in the middle.
- On the left side of the contact profile, scroll down to the folder Estimates and click the folder's name to open it.
- In Upload Estimate Doc Here ⚡, click Click to upload, pick your report on your computer and click Open.
- Click the blue Save button at the bottom of the left side.
Detail: Step 2: your report and the range
Move 4 · Set the range and send it
- In the left menu, click Contacts.
- Click in the search box at the top of the list and type the customer's last name or RO number.
- Click the customer's name in the list. Their contact profile opens. You are in the right place when you see the customer's name at the top left and their texts in the middle.
- On the left side of the contact profile, scroll down to the folder CARRIER & APPRAISER and click the folder's name to open it.
- Click in the box under My number and type your number (numbers only, no dollar sign).
- Click the blue Save button at the bottom of the left side.
- Scroll up to the folder CASE (just above CARRIER & APPRAISER). If its fields do not show, click the folder's name to open it.
- Click in the box under Range low and type the amount (numbers only, no dollar sign).
- Click in the box under Range high and type the amount (numbers only, no dollar sign).
- Check Carrier's offer (same folder). If it is empty, click in the box under it and type the insurer's offer (numbers only, no dollar sign).
- Click the blue Save button at the bottom of the left side.
- Look at the top of folder CASE. Send range comes right after Case status, the first field.
- Click the box under Send range ⚡ and pick Send it now from the list.
- Click the blue Save button at the bottom of the left side.
Detail: Step 2
Move 5 · Wait for the signature
Wait for the task Send the demand. (The customer signs; the invoice goes.) It appears on your Tasks page.
Detail: Step 3: the agreement and the fee
Move 6 · Send the demand
- In the left menu, click Contacts.
- Click in the search box at the top of the list and type the customer's last name or RO number.
- Click the customer's name in the list. Their contact profile opens. You are in the right place when you see the customer's name at the top left and their texts in the middle.
- On the left side of the contact profile, scroll down to the folder Insurance Info and click the folder's name to open it.
- Check Claim #. If it is empty, click in the box under it and type the insurer's claim number.
- If you changed it, click the blue Save button at the bottom of the left side.
- Scroll down to the folder FORM | Repair Authorization and click the folder's name to open it.
- Check Date of Loss. If it is empty, click the box under Date of Loss and pick the day in the calendar that opens.
- If you changed it, click the blue Save button at the bottom of the left side.
- Scroll up to the folder CARRIER & APPRAISER and click the folder's name to open it.
- Click in the box under Adjuster name and type the name.
- Click in the box under Adjuster email and type the email.
- Click the blue Save button at the bottom of the left side.
- Scroll up to the folder CASE (just above CARRIER & APPRAISER). If its fields do not show, click the folder's name to open it.
- In RTA or demand PDF, click Click to upload, pick your RTA on your computer and click Open.
- Click the blue Save button at the bottom of the left side.
- Scroll up to the top of folder CASE. The Send switches sit at the top of folder CASE, right after Case status.
- Click the box under Send demand ⚡ and pick Send it now from the list.
- Click the blue Save button at the bottom of the left side.
Detail: Step 4: the RTA
Move 7 · Their appraiser calls
When their appraiser calls:
- In the left menu, click Contacts.
- Click in the search box at the top of the list and type the customer's last name or RO number.
- Click the customer's name in the list. Their contact profile opens. You are in the right place when you see the customer's name at the top left and their texts in the middle.
- On the left side of the contact profile, scroll down to the folder CARRIER & APPRAISER and click the folder's name to open it.
- Click in the box under Other appraiser name and type the name.
- Click in the box under Other appraiser email and type the email.
- Click the box under Other appraiser contact date ⚡ and pick the day in the calendar that opens.
- Click the blue Save button at the bottom of the left side.
Detail: Step 5: the other appraiser
Move 8 · Send your report to their appraiser
- In the left menu, click Contacts.
- Click in the search box at the top of the list and type the customer's last name or RO number.
- Click the customer's name in the list. Their contact profile opens. You are in the right place when you see the customer's name at the top left and their texts in the middle.
- On the left side of the contact profile, scroll down to the folder CASE and click the folder's name to open it. The Send switches sit at the top of folder CASE, right after Case status.
- Click the box under Send our report ⚡ and pick Send it now from the list.
- Click the blue Save button at the bottom of the left side.
Detail: Step 5
Move 9 · Their figure comes in
- In the left menu, click Contacts.
- Click in the search box at the top of the list and type the customer's last name or RO number.
- Click the customer's name in the list. Their contact profile opens. You are in the right place when you see the customer's name at the top left and their texts in the middle.
If they gave you a figure:
- On the left side of the contact profile, scroll down to the folder CARRIER & APPRAISER and click the folder's name to open it.
- Click in the box under Their number ⚡ and type their figure (numbers only, no dollar sign).
- Click the blue Save button at the bottom of the left side.
If they sent their report instead:
- On the left side of the contact profile, scroll down to the folder Supplements and click the folder's name to open it.
- In Supplement #1 Upload Doc Here ⚡, click Click to upload, pick their report on your computer and click Open.
- Click the blue Save button at the bottom of the left side.
Detail: Step 6: negotiation
Move 10 · Send your counter
- In the left menu, click Contacts.
- Click in the search box at the top of the list and type the customer's last name or RO number.
- Click the customer's name in the list. Their contact profile opens. You are in the right place when you see the customer's name at the top left and their texts in the middle.
- On the left side of the contact profile, scroll down to the folder CARRIER & APPRAISER and click the folder's name to open it.
- Click in the box under Counteroffer and type your counter (numbers only, no dollar sign).
- If you want one line of reasoning in the email, click in the box under Negotiation note and type it (optional).
- Click the blue Save button at the bottom of the left side.
- Scroll up to the folder CASE (just above CARRIER & APPRAISER). If its fields do not show, click the folder's name to open it. The Send switches sit at its top, right after Case status.
- Click the box under Send counter ⚡ and pick Send it now from the list.
- Click the blue Save button at the bottom of the left side.
Repeat this move until you agree.
Detail: Step 6
Move 11 · If you cannot agree
- In the left menu, click Contacts.
- Click in the search box at the top of the list and type the customer's last name or RO number.
- Click the customer's name in the list. Their contact profile opens. You are in the right place when you see the customer's name at the top left and their texts in the middle.
- On the left side of the contact profile, scroll down to the folder CARRIER & APPRAISER and click the folder's name to open it.
- Click the box under Umpire ⚡ and pick Called from the list.
- Click the blue Save button at the bottom of the left side.
Detail: Step 7: the umpire
Move 12 · The award
- In the left menu, click Contacts.
- Click in the search box at the top of the list and type the customer's last name or RO number.
- Click the customer's name in the list. Their contact profile opens. You are in the right place when you see the customer's name at the top left and their texts in the middle.
- On the left side of the contact profile, scroll down to the folder OUTCOME and click the folder's name to open it.
- Click in the box under Award amount ⚡ and type the amount (numbers only, no dollar sign).
- Click the box under Award signed date ⚡ and pick the day in the calendar that opens.
- Click the blue Save button at the bottom of the left side.
Detail: Step 8: the award
Move 13 · Check the figures and send the summary
- In the left menu, click Contacts.
- Click in the search box at the top of the list and type the customer's last name or RO number.
- Click the customer's name in the list. Their contact profile opens. You are in the right place when you see the customer's name at the top left and their texts in the middle.
- On the left side of the contact profile, scroll down to the folder Insurance Info and click the folder's name to open it.
- Check Deductible. If it is wrong or empty, click in the box under it and type the right amount (numbers only, no dollar sign).
- If you changed it, click the blue Save button at the bottom of the left side.
- Scroll up to the folder OUTCOME and click the folder's name to open it.
- Check Title fees. If it is wrong or empty, click in the box under it and type the right amount (numbers only, no dollar sign).
- Check Sales tax %. If it is wrong or empty, click in the box under it and type the right number.
- If you changed either, click the blue Save button at the bottom of the left side.
- Scroll up to the folder CASE. If its fields do not show, click the folder's name to open it.
- Check Carrier's offer. If it is wrong or empty, click in the box under it and type the right amount (numbers only, no dollar sign).
- If you changed it, click the blue Save button at the bottom of the left side.
- Scroll up to the top of folder CASE. The Send switches sit at the top of folder CASE, right after Case status.
- Click the box under Send summary ⚡ and pick Send it now from the list.
- Click the blue Save button at the bottom of the left side.
Detail: Step 9: the settlement summary
Move 14 · The fee arrives
If the customer paid the Square invoice, pdrOS sets Fee paid to Square and texts you: nothing to do. For Venmo, a check, cash or a waived fee:
- In the left menu, click Contacts.
- Click in the search box at the top of the list and type the customer's last name or RO number.
- Click the customer's name in the list. Their contact profile opens. You are in the right place when you see the customer's name at the top left and their texts in the middle.
- On the left side of the contact profile, scroll down to the folder CASE and click the folder's name to open it.
- Click the box under Fee paid ⚡ and pick Venmo, Check, Cash or Waived.
- Click the blue Save button at the bottom of the left side.
Then record the payment on the invoice, or void it if you waived the fee. The clicks are in Step 10: the fee and the close.
Detail: Step 10: the fee and the close
Between moves: your tasks
- In the left menu, click Tasks. My Tasks opens.
- Click the task's row. A short preview opens under it.
- Click Open Full View and read the task.
- Click the link under WHERE. The customer's contact profile opens in a new browser tab.
- Do the step the task names (often one of the moves above).
- Click the browser tab with the Tasks page.
- Click the green Mark Complete button at the bottom right of the full view.
If the task is already gone when you come back, pdrOS closed it because the step happened.
That is the whole job. Every other case type is this list with two or three lines different: Diminished value, Short pay, Post-repair inspection.
Did this page not match what you see? Ask the support chat or open a support ticket. We change the page, not you.