The left side: the folders and what each field does
Answers: what is this field? which folder is it in? how do I open a folder and save a change? what happens when I change it?
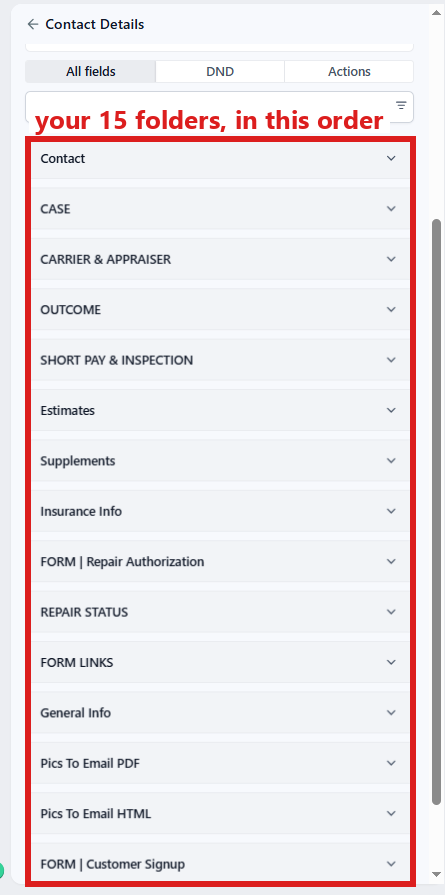
The left side of the contact profile holds every fact about the case, in 15 folders. This page walks down them in the order you see them, top to bottom. Fields marked ⚡ start work when you save them.
Rule for all of them: pdrOS fills most dates and statuses for you. You type only what the task asks for.
The six things you will touch most
Arrows mean: click this, then this. "The customer" means: search their last name or RO number (your case number) in the Contacts list, then click their name.
| Field | Where, and what you do | What it does |
|---|---|---|
| Upload Estimate Doc Here ⚡ | Contacts → the customer → folder Estimates → Upload Estimate Doc Here → Click to upload → your PDF → Open → the blue Save button at the bottom of the left side | Your report or rewrite. Moves the case and gives you the Set the range task. |
| The five Send switches ⚡ | Contacts → the customer → folder CASE → the top of the folder → the box under the switch → Send it now → the blue Save button | Each sends one email as you. The Send switches |
| Their number ⚡ | Contacts → the customer → folder CARRIER & APPRAISER → Their number → type the amount (numbers only, no dollar sign) → the blue Save button | The other side's figure. Stops every chase, gives you the Negotiate task. |
| Counteroffer | Contacts → the customer → folder CARRIER & APPRAISER → Counteroffer → type the amount (numbers only, no dollar sign) → the blue Save button | Your next figure, sent by Send counter. |
| Award amount and Award signed date ⚡ | Contacts → the customer → folder OUTCOME → Award amount: type the amount; Award signed date: pick the day → the blue Save button | Both together settle the case. |
| Fee paid ⚡ | Contacts → the customer → folder CASE → Fee paid → pick Square, Venmo, Check, Cash or Waived → the blue Save button | How the fee was paid; closes the case once it has an Outcome. |
Everything else below is there when you need to look something up.
Open the left side
- In the left menu, click Contacts.
- Click in the search box at the top of the list and type the customer's last name or RO number.
- Click the customer's name in the list. Their contact profile opens.
You are in the right place when you see the customer's name at the top left and their texts in the middle.
Or, from a task. In the left menu, click Tasks. Click the task's row, then Open Full View. Click the link under WHERE (after the words "Open the case"). The contact profile opens in a new browser tab.
The left side starts with the customer's name, with Owner and Followers under it. Then come Tags, the RO number (RO# DO NOT EDIT THIS!!) and RO Type, three tabs (All fields, DND, Actions; stay on All fields), the Search fields and folders box, and then the 15 folders.
Change a field and save it
- Open the customer's contact profile ("Open the left side", above).
- On the left side of the contact profile, scroll down to the folder and click the folder's name to open it.
- Find the field. Can't find it? Type the field's name in the search box at the top of the left side (it reads Search fields and folders).
- Change the field. What you do depends on its type:
- A list: click the box under the field and pick the choice from the list.
- Claim side and Fee payer: lists; click the box under the field and pick the choice.
- A checkbox (Intake consent): leave it; the signup form fills it.
- A date: click the box under the field and pick the day in the calendar that opens.
- Money, a number or text: click in the box under the field and type. Amounts are numbers only, no dollar sign.
- A file: in the field, click Click to upload, pick the PDF on your computer and click Open. To look at a file already there, click its name in the field.
- A PDF address (Customer Signup Form PDF, Repair Authorization Form PDF, Damage Images PDF, Damage Images HTML): a text box holding the PDF's web address, not a clickable link. Leave it. Open the PDF with the Docs button in RO Hub: RO Hub → the case (type the RO number in the box under RO #:, click Search) → Docs → the document (Documents).
- Click the blue Save button at the bottom of the left side. It appears as soon as you change a field. Nothing happens and nothing is sent until you click it.
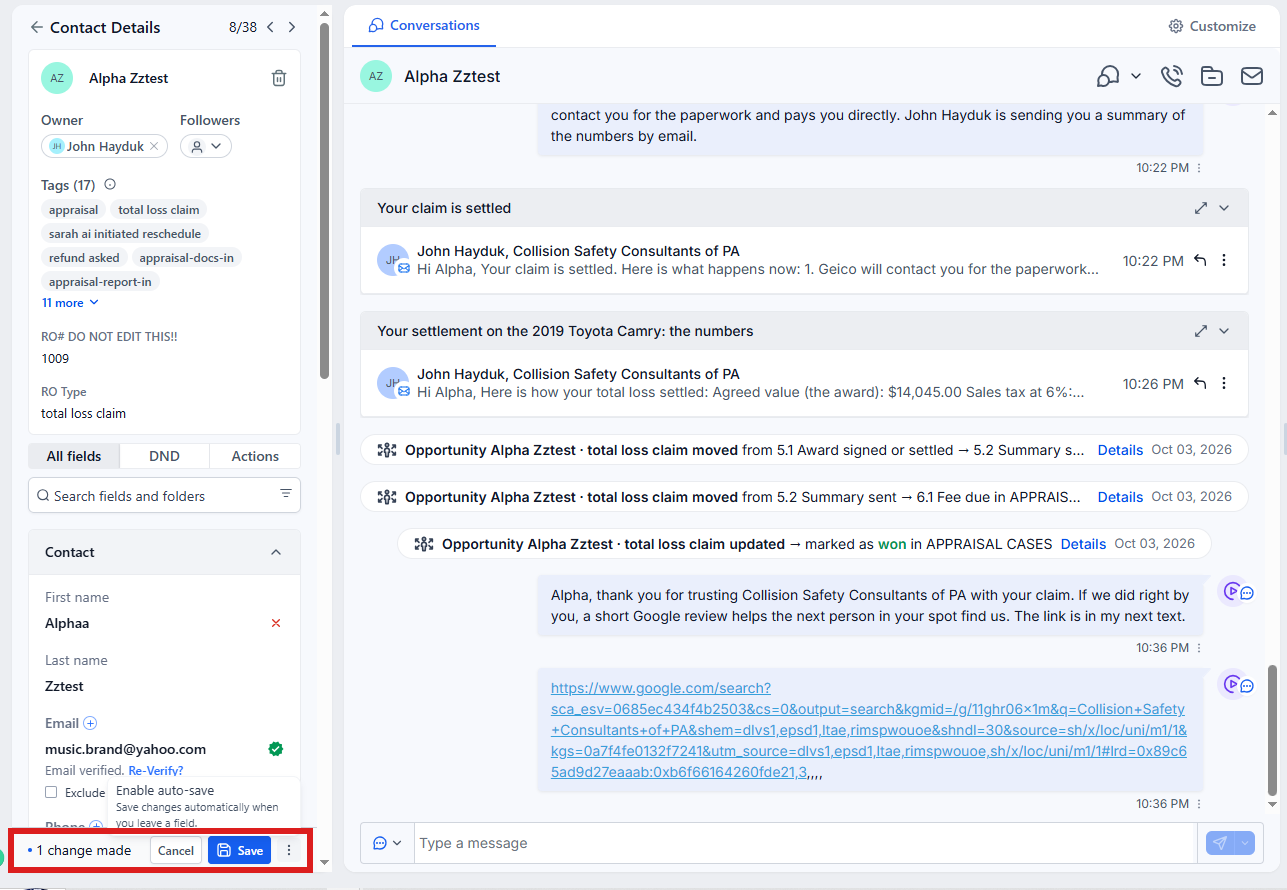
If no blue Save button appears. If you change a field and no blue Save button appears at the bottom of the left side, stop and tell us. Auto-Save has been switched on, and we switch it back. Until then pick Send switches carefully: they go the moment you choose.
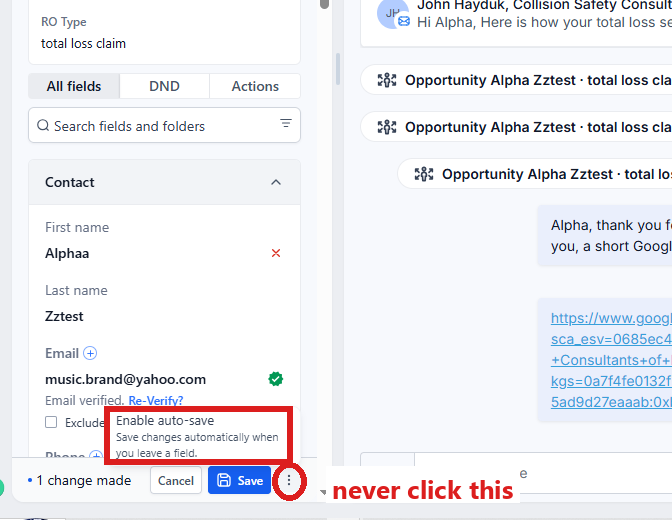
Never click Enable auto-save (it is under the three dots next to the blue Save button).
Tags, at the top of the left side
Tags are small labels pdrOS puts on the contact profile as the case moves (for example appraisal-hired). You can look at them; you cannot add or remove them. A tag starts or stops work, so we manage them for you (ask by Support ticket).
The 15 folders, top to bottom
Each folder below starts with how to open it.
A note on the dates pdrOS writes: erasing one changes nothing, with one exception. Erasing a sent date (for example RTA or demand sent date) lets you send that email again.
1. Contact
To open it: in the left menu, click Contacts. Click in the search box at the top of the list and type the customer's last name or RO number. Click the customer's name in the list. On the left side of the contact profile, click the folder Contact.
| Field | What you do | What it is | Who fills it |
|---|---|---|---|
| RO# DO NOT EDIT THIS!! | Nothing. Never change it. | Your RO number (your case number). Tasks show it as "CASE #1007", texts to you as "case #1007", customers see "file #1007": all the same number. Every text, email and task carries it. | pdrOS |
| Customer Vehicle / Customer Signup Form | Text: click in the box and type. | The customer's vehicle: year, make, model. | The signup form |
| Customer Signup Notes | Text: click in the box and type. | The notes typed on the signup form, kept as the original. pdrOS copies them into Other Special Instructions (folder Estimates). | The signup form |
This folder also holds the customer's name, phone and email (only the name also shows at the top of the left side). To change the phone or email: click in its box, delete the old one and type the new one (a phone with the area code). Then click the blue Save button at the bottom of the left side.
2. CASE (the one you use most)
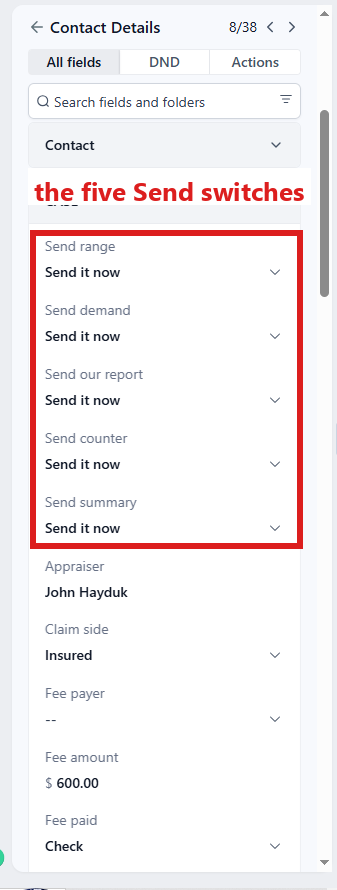
To open it: in the left menu, click Contacts. Click in the search box at the top of the list and type the customer's last name or RO number. Click the customer's name in the list. On the left side of the contact profile, scroll down to the folder CASE and click the folder's name. The first field is Case status; right under it come the five Send switches: Send range, Send demand, Send our report, Send counter, Send summary.
| Field | What you do | What it is | Who fills it |
|---|---|---|---|
| Case status | Text: leave it. | The one plain sentence for this stage: what Sarah says if the customer asks where things stand. | pdrOS |
| Send range ⚡ | List: click the box under Send range and pick Send it now (or I sent it myself). | The first Send switch, right after Case status. Sends your range to the customer. | You |
| Send demand, Send our report, Send counter, Send summary ⚡ | List: click the box under the switch and pick Send it now (or I sent it myself). | Four of the five Send switches. Each sends one email as you. See The Send switches. | You |
| Appraiser | Nothing. | Your name as the appraiser, written at signup. | pdrOS |
| Claim side | List: click the box under Claim side and pick Insured or Claimant. | Insured when the customer's own insurer pays (every total loss); Claimant when the other driver's insurer pays. | The signup form; pdrOS sets Claimant when you take an inspection on |
| Fee payer | List: click the box under Fee payer and pick Owner or Shop. | Shop means no invoice to the customer and an "Invoice the shop" task for you. Never tell a customer or an insurer that the shop pays. | The signup form, or you |
| Fee amount | Money: click in the box and type the amount. | The fee, $600 by default. A different amount means you invoice by hand (you get a task). | pdrOS, or you before signing |
| Fee paid ⚡ | List: click the box under Fee paid and pick No, Square, Venmo, Check, Cash or Waived. | How the fee was paid. Anything but No closes the case once there is an Outcome. | You (pdrOS writes Square when a Square invoice is paid) |
| Referring shop, Referring shop contact, Referring shop email | Text: click in the box and type. | The shop that sent the customer: its name, the person, the email. On a short pay the shop gets the upload email. | The signup form or the shop referral form, or you |
| How they found us | List: click the box under How they found us and pick Shop, Past customer, Google or Other. | How the customer found you. | The signup form |
| Agreement signed date | Date: leave it. | The day the customer signed. | pdrOS |
| Range low, Range high | Money: click in the box and type the amount. | Your range to the customer. | You |
| Carrier's offer | Money: click in the box and type the amount. | The insurer's first offer. Used in the range email and the settlement summary. | The signup form, or you |
| Intake consent | Leave it. It is checked only when the customer said yes on the signup form. | The box checked at signup: permission to text the customer. | The signup form |
| Agreement type | List: leave it. | Which agreement wording the customer signed. | pdrOS |
| Carrier valuation report, Repair invoice, Shop estimate PDF, Carrier estimate PDF ⚡ | File: click Click to upload, pick the PDF, click Open. | The four document boxes. A file landing in any of them can complete the documents step. | The customer or the shop through the upload link; you can upload too |
| Referring shop phone | Phone: click in the box and type the number. | The referring shop's phone number. | You |
| RTA or demand PDF | File: click Click to upload, pick the PDF, click Open. | The RTA (insured) or demand letter (claimant) you made in RTAflow. Needed before Send demand. | You |
| Documents in date, Range sent date | Date: leave it. | Dates pdrOS writes when each thing happens. | pdrOS |
| Stage rank | Number: leave it. | A number pdrOS uses to know where the case is. | pdrOS |
3. CARRIER & APPRAISER
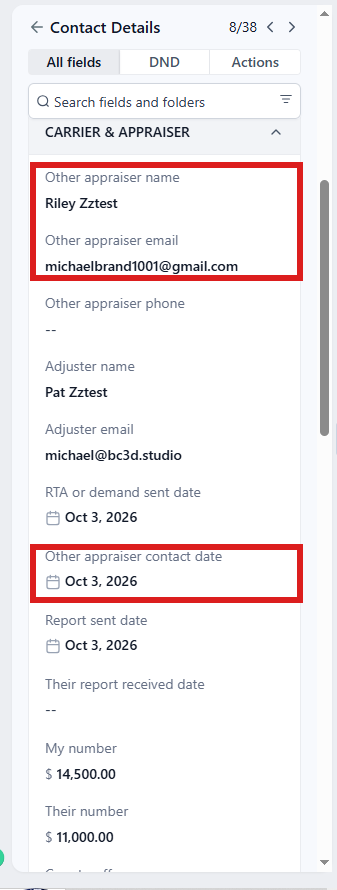
To open it: in the left menu, click Contacts. Click in the search box at the top of the list and type the customer's last name or RO number. Click the customer's name in the list. On the left side of the contact profile, scroll down to the folder CARRIER & APPRAISER and click the folder's name.
| Field | What you do | What it is | Who fills it |
|---|---|---|---|
| Other appraiser name, Other appraiser email, Other appraiser phone | Text: click in the box and type. | Their appraiser. The email is needed before Send our report (on a claimant case the report goes to the adjuster instead, so Adjuster email is the one needed). | You |
| Adjuster name, Adjuster email | Text: click in the box and type. | The insurer's adjuster. The email must be valid before Send demand. | The signup form, or you |
| RTA or demand sent date ⚡ | Date: click the box and pick the day. | Written by pdrOS when the demand goes. Typing it yourself, or choosing I sent it myself, starts Clock A (the seven to ten business days their appraiser has to make contact) on an insured case and the demand chase on a claimant case. On an inspection taken on against a shop it only moves the case to 3.1 and writes the note "Letter to the shop sent by John himself"; no chase, no text. | pdrOS, or you |
| Other appraiser contact date ⚡ | Date: click the box and pick the day. | The day their appraiser first made contact. Stops Clock A, texts the customer, gives you the task Their appraiser is in contact · send our report. | You |
| Report sent date ⚡ | Date: leave it. | Written by pdrOS when your report goes. Typed by hand, it starts Clock B (the wait for their report: two chase emails, then a task on day 22). | pdrOS |
| Their report received date | Date: leave it. | Written by pdrOS when their report lands in Supplement #1 Upload Doc Here (folder Supplements). | pdrOS |
| My number | Money: click in the box and type the amount. | Your valuation. Needed by Send counter. | You |
| Their number ⚡ | Money: click in the box and type the amount. | The other side's figure. Stops every chase and clock, texts you, gives you the Negotiate task. | You |
| Counteroffer | Money: click in the box and type the amount. | Your next figure, sent by Send counter. | You |
| Umpire ⚡ | List: click the box under Umpire and pick No, Called or Decided. | Called sends the customer a text and an email about the umpire step and gives you the Umpire task. | You |
| Umpire fee received | List: click the box and pick Received. | Pick it when the customer has paid your invoice for their half of the umpire's fee. | You |
| Demand-by date ⚡ | Date: click the box and pick the day. | A deadline you set. pdrOS texts you and makes a task 14 days before it, and texts you again 3 days before. | You |
| Statute deadline ⚡ | Date: click the box and pick the day. | Two years from the date of loss on a diminished value or claimant inspection, set by pdrOS and told to the customer. Alerts 14 and 3 days before. | pdrOS, or you |
| Chase count | Number: leave it. | How many chase emails have gone on this case. | pdrOS |
| Tortfeasor letter sent date ⚡ | Date: click the box and pick the day. | On a claimant case, the day you sent the pre-court letter. Moves the case to Pre-court. | You |
| Appraisal Document Upload Link | Nothing. To send it to this customer, see Your three links. | This customer's own upload link. Files sent through it land on their contact profile by themselves. Never send it to another customer. | pdrOS |
| Negotiation note | Text: click in the box and type one line. | Your one line of reasoning, sent with your counter by Send counter. | You |
| Counter sent date ⚡ | Date: leave it. | Written by pdrOS when your counter goes. Typed by hand, it starts the 7-day silence clock. | pdrOS |
4. OUTCOME
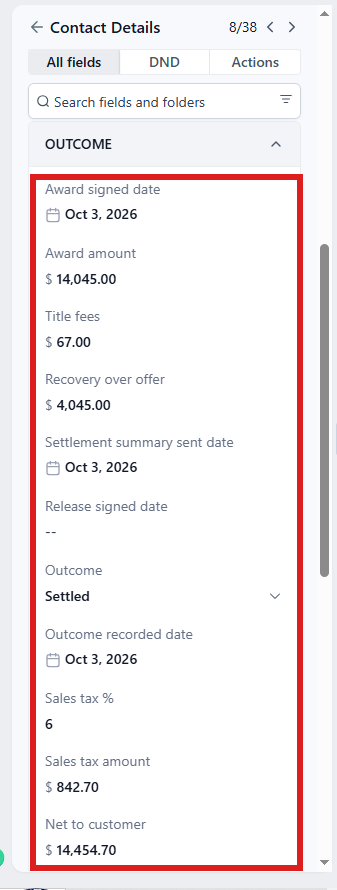
To open it: in the left menu, click Contacts. Click in the search box at the top of the list and type the customer's last name or RO number. Click the customer's name in the list. On the left side of the contact profile, scroll down to the folder OUTCOME and click the folder's name.
| Field | What you do | What it is | Who fills it |
|---|---|---|---|
| Award signed date ⚡, Award amount ⚡ | Date: click the box and pick the day. Money: click in the box and type the amount. | Both together settle the case: the customer gets the Settled text and email, you get the summary task. | You |
| Title fees | Money: click in the box and type the amount. | One of the five numbers the total loss summary needs. | You |
| Recovery over offer | Money: leave it. | Computed by pdrOS when the summary goes. | pdrOS |
| Settlement summary sent date | Date: leave it. | Written by pdrOS when the summary goes. | pdrOS |
| Release signed date | Date: click the box and pick the day. | On a diminished value case, the day the carrier's release was signed. For your record only; nothing reads it. | You |
| Outcome ⚡ | List: click the box under Outcome and pick Settled, Counteroffer pending, Carrier review report received, Customer took the carrier's number, Court, Went quiet, Withdrawn or Report only. | How the case ended. Closes the case, or keeps it open: Counteroffer pending and Carrier review report received ask the customer every 30 days; Court waits for you. See Other endings. | pdrOS writes Settled; you pick the others |
| Outcome recorded date | Date: leave it. | When the case closed. | pdrOS |
| Sales tax % | Number: click in the box and type it. | One of the five numbers the total loss summary needs. Preset to 6. | You |
| Sales tax amount, Net to customer | Money: leave it. | Computed by pdrOS when the summary goes. | pdrOS |
5. SHORT PAY & INSPECTION
To open it: in the left menu, click Contacts. Click in the search box at the top of the list and type the customer's last name or RO number. Click the customer's name in the list. On the left side of the contact profile, scroll down to the folder SHORT PAY & INSPECTION (right after OUTCOME) and click the folder's name.
| Field | What you do | What it is | Who fills it |
|---|---|---|---|
| Shop estimate total, Carrier estimate total | Money: click in the box and type the amount. | The two totals on a short pay. | You or Sharon, optional (the short pay tasks print it) |
| Rewritten estimate total | Money: click in the box and type the amount. | The total of the rewrite on a short pay. | You (a record) |
| Variance | Money: click in the box and type the amount. | The gap between the shop's total and the carrier's total. | You or Sharon (a record) |
| Inspection location | List: click the box and pick Our office or Travel. | Travel adds the travel fee and skips the booking link. | The signup form |
| Travel fee | Money: leave it. | $600 on a travel inspection. | pdrOS |
| Engaged against ⚡ | List: click the box under Engaged against and pick None, Shop or Carrier. | After an inspection report: None (report only, the case closes after the fee), Shop or Carrier (you take it on). | You |
Other words for this
folder = section of the left side, the left column; field = box; Send switch = the dropdown; RO number = RO#, case number, the "file #" customers see; contact profile = the customer's screen; their appraiser = the other appraiser, the other side's appraiser.
6. Estimates
To open it: in the left menu, click Contacts. Click in the search box at the top of the list and type the customer's last name or RO number. Click the customer's name in the list. On the left side of the contact profile, scroll down to the folder Estimates and click the folder's name.
| Field | What you do | What it is | Who fills it |
|---|---|---|---|
| Upload Estimate Doc Here ⚡ | File: click Click to upload, pick the PDF on your computer, click Open. | Your report (total loss, diminished value, inspection) or your rewrite (short pay). Uploading it moves the case and starts the next step. A second upload replaces the file and only leaves a note. | You |
| Upload Insurance Approved Estimate PDF | File: click Click to upload, pick the PDF on your computer, click Open. | The signed award, when the Negotiate task asks for it. Nothing reads it; it is your record. | You |
| Other Special Instructions | Text: click in the box and type. | The signup notes, copied here by pdrOS, and what a shop wrote on its referral. | pdrOS |
7. Supplements
To open it: in the left menu, click Contacts. Click in the search box at the top of the list and type the customer's last name or RO number. Click the customer's name in the list. On the left side of the contact profile, scroll down to the folder Supplements and click the folder's name.
| Field | What you do | What it is | Who fills it |
|---|---|---|---|
| Supplement #1 Upload Doc Here ⚡ | File: click Click to upload, pick the PDF on your computer, click Open. | The other appraiser's report. Uploading it stops every chase and gives you the Negotiate task. | You |
8. Insurance Info
To open it: in the left menu, click Contacts. Click in the search box at the top of the list and type the customer's last name or RO number. Click the customer's name in the list. On the left side of the contact profile, scroll down to the folder Insurance Info and click the folder's name.
| Field | What you do | What it is | Who fills it |
|---|---|---|---|
| Insurance Company | Text: click in the box and type the name. | The insurer on the claim. Printed in the range email, the demand and the stage sentences. | The signup form, or you |
| Deductible | Money: click in the box and type the amount (numbers only, no dollar sign). | One of the five numbers the total loss summary needs. | You |
| Claim # | Text: click in the box and type the number. | The insurer's claim number. Needed before Send demand, Send our report and Send counter. | The signup form, or you |
9. FORM | Repair Authorization
To open it: in the left menu, click Contacts. Click in the search box at the top of the list and type the customer's last name or RO number. Click the customer's name in the list. On the left side of the contact profile, scroll down to the folder FORM | Repair Authorization and click the folder's name.
| Field | What you do | What it is | Who fills it |
|---|---|---|---|
| Repair Authorization Form PDF | Nothing (a text box with the web address). To open the PDF: RO Hub → the case (type the RO number in the box under RO #:, click Search) → Docs → Repair Authorization Form. | The signed agreement as a PDF, made when the customer signs. | pdrOS |
| VIN | Text: click in the box and type. | The vehicle's VIN, typed by the customer when they sign. | The customer, on the agreement |
| Date of Loss ⚡ | Date: click the box under Date of Loss and pick the day. | The accident date. On a diminished value case, and on an inspection with Claim side Claimant, pdrOS sets the statute deadline from it (two years) and tells the customer. Needed before Send demand. | The signup form, or you |
10. REPAIR STATUS
To open it: in the left menu, click Contacts. Click in the search box at the top of the list and type the customer's last name or RO number. Click the customer's name in the list. On the left side of the contact profile, scroll down to the folder REPAIR STATUS and click the folder's name.
| Field | What you do | What it is | Who fills it |
|---|---|---|---|
| RO Type ⚡ | List: click the box under RO Type and pick total loss claim, diminished value, short pay or post-repair inspection. | The kind of case. Changing it re-sends that type's first request and swaps the agreement link. See Wrong type. The list has twelve choices. The other eight (hail, collision and so on) are body shop jobs; picking one stops the appraisal path. | The signup form (Repair Order Type); you, only to correct a mistake |
11. FORM LINKS
To open it: in the left menu, click Contacts. Click in the search box at the top of the list and type the customer's last name or RO number. Click the customer's name in the list. On the left side of the contact profile, scroll down to the folder FORM LINKS and click the folder's name.
| Field | What you do | What it is | Who fills it |
|---|---|---|---|
| REPAIR AUTHORIZATION LINK | Nothing. Leave it as it is. | This customer's own agreement link: the page where they sign. pdrOS swaps it when the type changes. Never send it to another customer. | pdrOS |
12. General Info
To open it: in the left menu, click Contacts. Click in the search box at the top of the list and type the customer's last name or RO number. Click the customer's name in the list. On the left side of the contact profile, scroll down to the folder General Info and click the folder's name.
It holds the customer's mailing address: street, city, state and postal code. Nothing in it starts work. To change the address: click in a box, delete the old value and type the new one. Then click the blue Save button at the bottom of the left side.
13. Pics To Email PDF
To open it: in the left menu, click Contacts. Click in the search box at the top of the list and type the customer's last name or RO number. Click the customer's name in the list. On the left side of the contact profile, scroll down to the folder Pics To Email PDF and click the folder's name.
| Field | What you do | What it is | Who fills it |
|---|---|---|---|
| Damage Images PDF | Nothing (a text box with the web address). To open the PDF: RO Hub → the case (type the RO number in the box under RO #:, click Search) → Docs → Scope Sheet Images (PDF). | The same photo report as a PDF. On an inspection, photos here give you the "Write the inspection report" task. | pdrOS |
14. Pics To Email HTML
To open it: in the left menu, click Contacts. Click in the search box at the top of the list and type the customer's last name or RO number. Click the customer's name in the list. On the left side of the contact profile, scroll down to the folder Pics To Email HTML and click the folder's name.
| Field | What you do | What it is | Who fills it |
|---|---|---|---|
| Damage Images HTML | Nothing (a text box with the web address). To see the photo report: RO Hub → the case (type the RO number in the box under RO #:, click Search) → Docs → Scope Sheet Images (HTML). | The photo report as a web page, built when the customer sends photos through the upload link. | pdrOS |
15. FORM | Customer Signup
To open it: in the left menu, click Contacts. Click in the search box at the top of the list and type the customer's last name or RO number. Click the customer's name in the list. On the left side of the contact profile, scroll down to the folder FORM | Customer Signup and click the folder's name.
| Field | What you do | What it is | Who fills it |
|---|---|---|---|
| Customer Signup Form PDF | Nothing (a text box with the web address). To open the PDF: RO Hub → the case (type the RO number in the box under RO #:, click Search) → Docs → Customer Signup Form. | The signup sheet as a PDF, made within a minute of the signup. | pdrOS |
Did this page not match what you see? Ask the support chat or open a support ticket. We change the page, not you.