Post-repair inspection: the visit and the report
Answers: what do I do at the inspection? how do they sign at the visit? how do I add the photos? how do I send the report? how do I record their decision?
At the visit the customer signs if they have not, you take photos, you write the report and upload it. pdrOS emails the customer the report and the photos and asks them what they want next.
At the visit
If they have not signed
On your phone:
- Open the text "NAME arrives at [time] and has not signed the agreement. Have them sign on your phone: [link]".
- Tap the link in it. The agreement opens.
- Hand them your phone and let them sign.
The $600 invoice (plus travel) goes by text and email as soon as they do.
No text on your phone? Open their agreement link on the computer:
- In the left menu, click Contacts.
- Click in the search box at the top of the list and type the customer's last name or RO number (your case number).
- Click the customer's name in the list. Their contact profile opens. You are in the right place when you see the customer's name at the top left and their texts in the middle.
- On the left side of the contact profile, scroll down to the folder FORM LINKS and click the folder's name to open it.
- Click in the box under REPAIR AUTHORIZATION LINK. Do not type anything in this box; you are only copying.
- Press Ctrl and A together to select the whole link (on a Mac, Cmd and A).
- Press Ctrl and C together to copy it (on a Mac, Cmd and C).
- Press Ctrl and T together (on a Mac, Cmd and T). A new browser tab opens.
- Click in the address bar at the top of the browser.
- Press Ctrl and V together to paste the link (on a Mac, Cmd and V).
- Press Enter. The agreement opens.
- Turn the screen to the customer and let them sign.
If a blue Save button appeared at the bottom of the left side after step 5, you changed the link by mistake: do not click it. Click Cancel next to the blue Save button; the field goes back to what it was.
The photos
Before you leave for the visit, send yourself the customer's upload link, so you can open it on your phone:
- In the left menu, click Contacts.
- Click in the search box at the top of the list and type the customer's last name or RO number.
- Click the customer's name in the list. Their contact profile opens. You are in the right place when you see the customer's name at the top left and their texts in the middle.
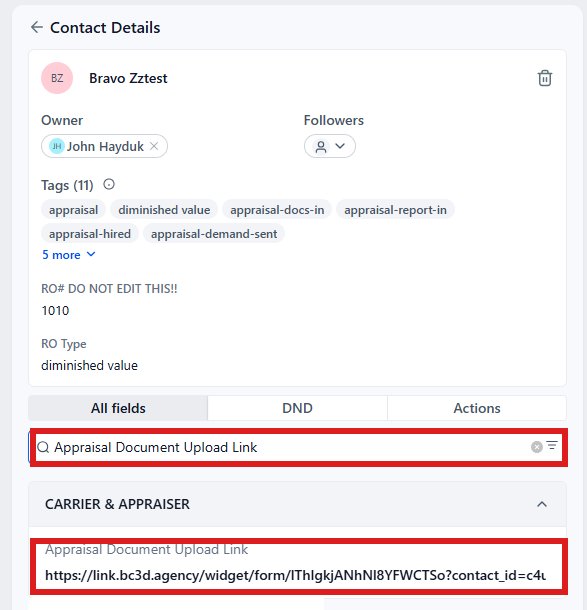
- On the left side of the contact profile, scroll down to the folder CARRIER & APPRAISER and click the folder's name to open it. (If you already see its fields, it is open: clicking its name again closes it.)
- Click in the box under Appraisal Document Upload Link. Do not type anything in this box; you are only copying.
- Press Ctrl and A together to select the whole link (on a Mac, Cmd and A).
- Press Ctrl and C together to copy it (on a Mac, Cmd and C).
- Open your email in a new browser tab, as you normally do.
- Start a new email to your own address.
- Click in the message and press Ctrl and V together to paste the link (on a Mac, Cmd and V).
- Send the email.
If a blue Save button appeared at the bottom of the left side after step 5, you changed the link by mistake: do not click it. Click Cancel next to the blue Save button; the field goes back to what it was.
At the visit, on your phone:
- Open that email.
- Tap the link. The customer's upload page opens.
- Tap Upload Photos Here.
- Pick the pictures from your phone.
pdrOS builds the photo report and gives you the task Write the inspection report · NAME. To open it: In the left menu, click RO Hub. Click in the box under RO #: at the top (it reads Enter repair order number), type the RO number (your case number) and click Search. Click the small Docs button, to the right of the Contacts button. The RO Documents window opens and lists the case's documents; click Scope Sheet Images (PDF) (or (HTML) for the web page) and it opens in a new browser tab.
The report
Write the report, then upload it. You work from the task Write the inspection report · NAME.
You can also start from the task. In the left menu, click Tasks. Click the row Write the inspection report · NAME, then Open Full View. Click the link under WHERE (after the words "Open the case"). The contact profile opens in a new browser tab. Then start at step 4.
- In the left menu, click Contacts.
- Click in the search box at the top of the list and type the customer's last name or RO number.
- Click the customer's name in the list. Their contact profile opens. You are in the right place when you see the customer's name at the top left and their texts in the middle.
- On the left side of the contact profile, scroll down to the folder Estimates and click the folder's name to open it.
- In Upload Estimate Doc Here ⚡, click Click to upload.
- Pick your report on your computer and click Open.
- Click the blue Save button at the bottom of the left side.
Within a minute: 1. The case moves to 2.2 Inspection report sent. 2. The customer gets the email "Your post-repair inspection report · [vehicle]" with the report and the photo page, and a text: "I've emailed you your inspection report and the photos. When you've read it, tell me: report only, or do you want us to take it on with the shop or the insurer?" 3. You get the task Record their decision · NAME.
Then close the report task:
- In the left menu, click Tasks. My Tasks opens. You are in the right place when you see the boxes Overdue, Due Today, This Week and Completed at the top.
- Click the row Write the inspection report · NAME (click Due Today or Overdue at the top if you do not see it). A short preview opens under it.
- Click Open Full View.
- Click the green Mark Complete button at the bottom right of the full view.
If the task is already gone when you come back, pdrOS closed it because the step happened.
A file in the wrong box
On an inspection, the four document boxes do nothing (there is no documents step). They are Carrier valuation report, Repair invoice, Shop estimate PDF and Carrier estimate PDF, in folder CASE. Only Upload Estimate Doc Here (folder Estimates) moves the case. If your report went into a document box, upload it again with the steps in The report above.
Their decision
When they answer, set Engaged against and close the task Record their decision · NAME. The steps, and what each choice does, are on the next page: Engaged against.
Did this page not match what you see? Ask the support chat or open a support ticket. We change the page, not you.