Notes, Tasks and Appointments: the right edge of the contact profile
Answers: how do I see what pdrOS did on a case? where do I add, change or reassign a task? where do I book, move or cancel an appointment?
A narrow column of small icons runs down the far right edge of every contact profile. Three of them matter most. Notes is the case's timeline. Tasks is where you add or change a task. Appointments is the only place to book an inspection. Hold the mouse over an icon to see its name; click it and its panel opens beside it.
Notes: the timeline
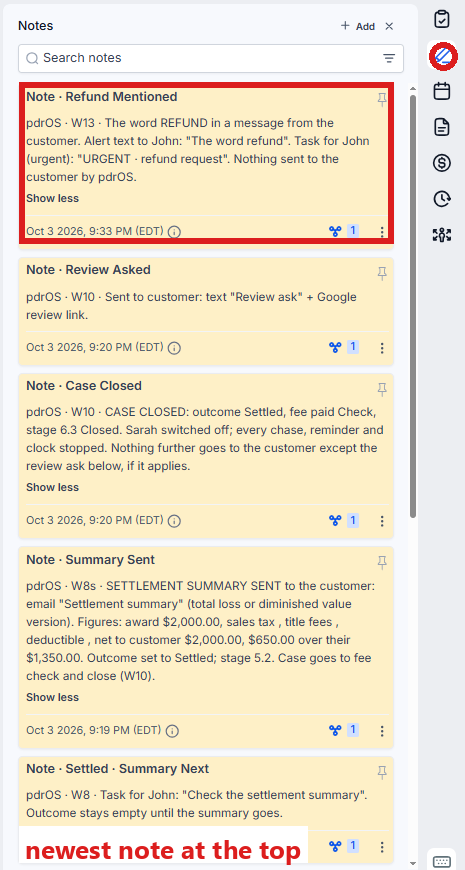
Every time pdrOS does something on a case it writes a note, newest at the top, with the time. "Case OPENED", "Range SENT", "Demand SENT to Pat Smith (the adjuster)", "Their figure in", "Settled", "CASE CLOSED".
Use it two ways: - After you do something: wait up to two minutes, read the top note. It tells you what pdrOS sent, to whom, with what attached, and what happens next. - When a customer calls: read down the notes and you have the whole history in order, without opening anything else.
To read the notes, or add your own:
- In the left menu, click Contacts.
- Click in the search box at the top of the list and type the customer's last name or RO number (your case number).
- Click the customer's name in the list. Their contact profile opens. You are in the right place when you see the customer's name at the top left and their texts in the middle.
- On the far right edge of the contact profile, click the Notes icon (it looks like a pen; hold the mouse over the icons to see their names). The notes open beside it, newest at the top.
- To add your own note, click + Add at the top of the notes.
- Type a title and the note.
- Click Save under the note you typed. (The blue Save button at the bottom of the left side is only for fields.)
A note you write does nothing; it just stays in the notes. Notes also appear in the middle of the contact profile, mixed in with the texts and emails, in time order.
Tasks: add, change, reassign
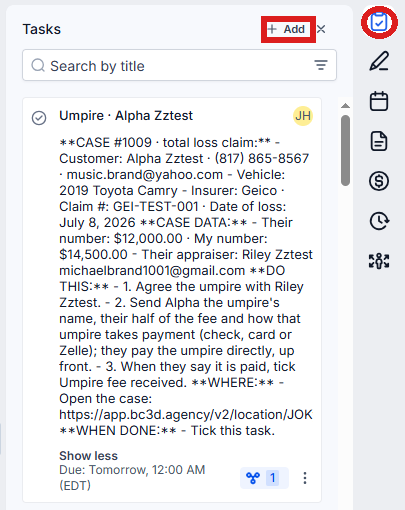
The tasks pdrOS creates for you also appear here, plainer than on the Tasks page.
- In the left menu, click Contacts.
- Click in the search box at the top of the list and type the customer's last name or RO number.
- Click the customer's name in the list. Their contact profile opens. You are in the right place when you see the customer's name at the top left and their texts in the middle.
- On the far right edge of the contact profile, click the Tasks icon (a clipboard with a check mark). The customer's tasks open beside it.
To add a task of your own:
- Click + Add.
- Type the Title.
- Pick the Due Date and Time.
- Pick the Assignee (you or Sharon).
- Click Save at the bottom of the task panel.
To change a task's date or title, or give it to Sharon or to yourself:
- Click the task's title.
- Change the date, the title or the Assignee.
- Click Save at the bottom of the task panel.
To mark a task complete, use the Tasks page: in the left menu, click Tasks, click the task's row, click Open Full View, then click the green Mark Complete button. If the task is already gone when you come back, pdrOS closed it because the step happened.
The Tasks page is also the easier place to read a task, with its links clickable.
Appointments: the only place to book
- In the left menu, click Contacts.
- Click in the search box at the top of the list and type the customer's last name or RO number.
- Click the customer's name in the list. Their contact profile opens. You are in the right place when you see the customer's name at the top left and their texts in the middle.
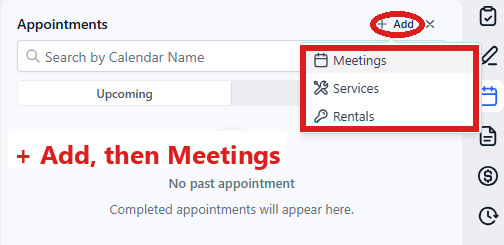
- On the far right edge of the contact profile, click the Appointments icon (a calendar). You are in the right place when the panel's title reads Appointments.
To book:
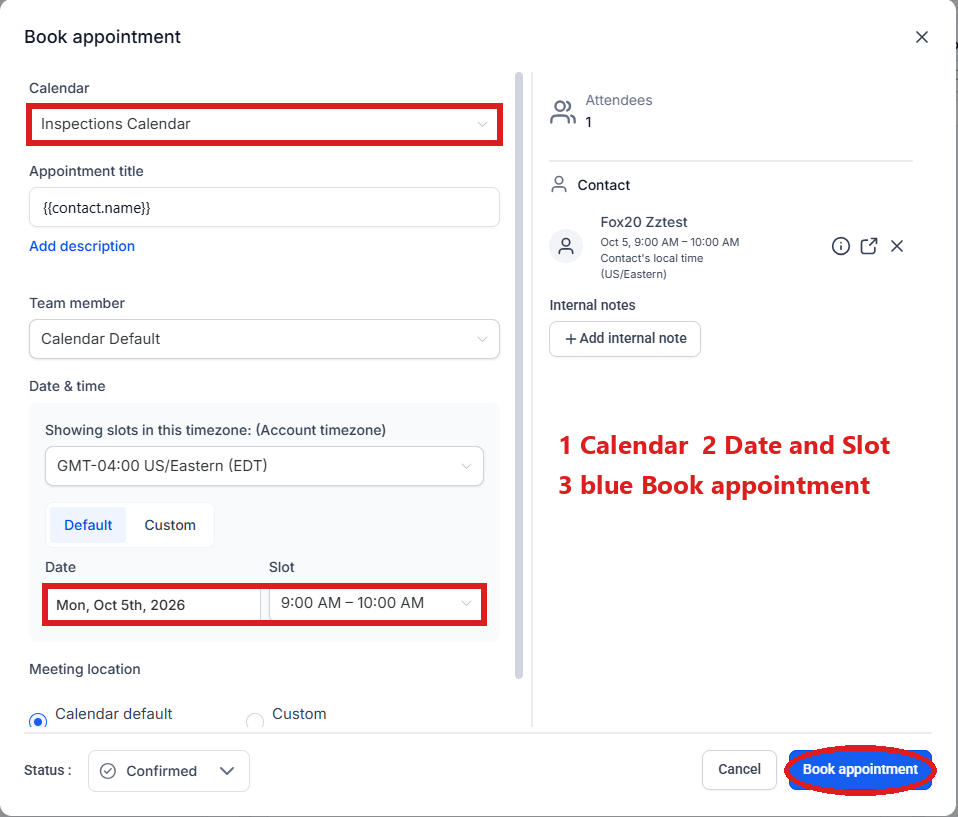
- Click + Add at the top of the panel. A small menu opens; click Meetings. The Book appointment window opens.
- Under Calendar, make sure it reads Inspections Calendar (if not, click the box and pick it).
- Under Date & time, click the box under Date and pick the day, then the box under Slot and pick a free time.
- Click the blue Book appointment button at the bottom right.
Within a minute the customer gets the confirmation text and email, and the case moves to Inspection booked.
To move a time:
- Click the three dots at the right of the appointment and pick Edit. The Edit details panel opens.
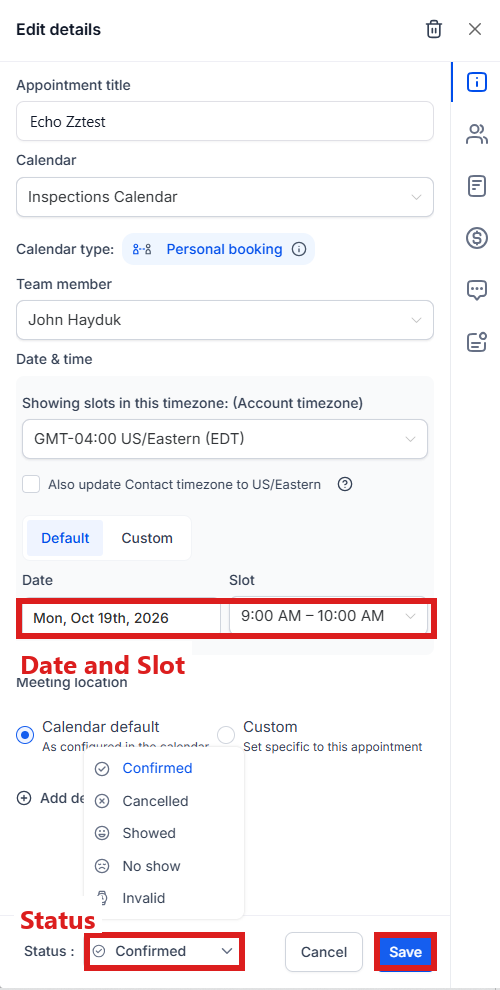
- Under Date & time, click Date and pick the new day, then click Slot and pick the new time.
- Click Save at the bottom right of the panel.
The customer gets a fresh confirmation with the new time.
To cancel, or to mark a no show:
- To cancel: click the three dots at the right of the appointment and pick Cancel.
To mark a no show instead:
- Click the three dots at the right of the appointment and pick Edit. The Edit details panel opens.
- At the bottom of the panel, click the box next to Status and pick No show.
- Click Save at the bottom right.
The customer gets a rebook text with the booking link, and you get a text.
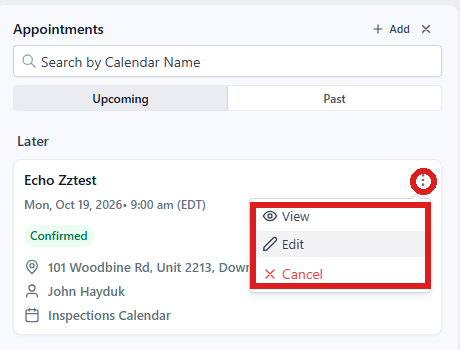
The same panel lists the customer's appointments, so you can see the history.
Never book by typing a new name into the Calendars page (left menu Calendars). That makes a second contact profile with no case, and you get an alert saying so. Book from the customer's contact profile.
Did this page not match what you see? Ask the support chat or open a support ticket. We change the page, not you.