Post-repair inspection: Engaged against (the customer's choice)
Answers: the customer read the report, what do I set? what does Report only do? how do I send the demand on an inspection? what if I set None by mistake?
After the report, the customer chooses: report only, or take it on against the shop or the carrier. You record that in one field and pdrOS takes the right path.
Set it
You can also start from the task. In the left menu, click Tasks. Click the row Record their decision · NAME, then Open Full View. Click the link under WHERE (after the words "Open the case"). The contact profile opens in a new browser tab. Then start at step 4.
- In the left menu, click Contacts.
- Click in the search box at the top of the list and type the customer's last name or RO number (your case number).
- Click the customer's name in the list. Their contact profile opens. You are in the right place when you see the customer's name at the top left and their texts in the middle.
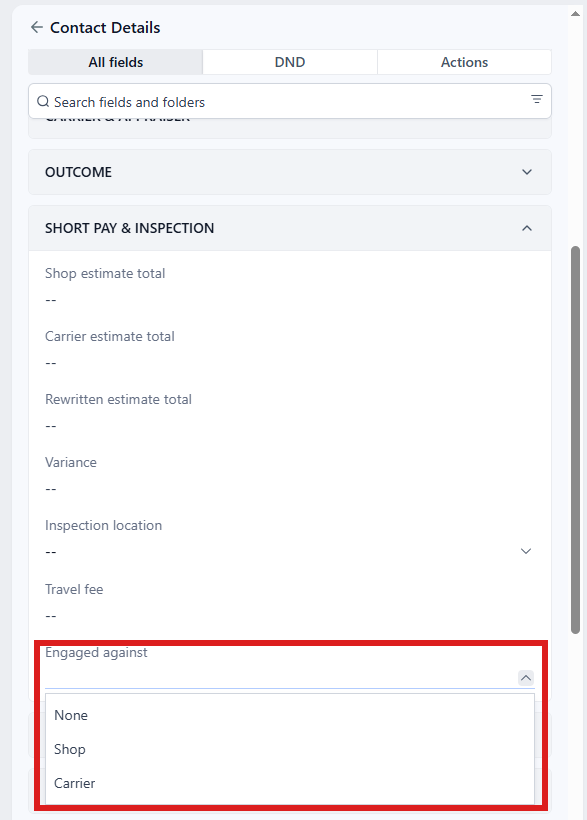
- On the left side of the contact profile, scroll down to the folder SHORT PAY & INSPECTION and click the folder's name to open it. It is the fifth folder, right after OUTCOME. (If you already see its fields, it is open: clicking its name again closes it.)
- Click the box under Engaged against ⚡ and pick None, Shop or Carrier from the list.
- Click the blue Save button at the bottom of the left side.
Then close the task Record their decision · NAME:
- In the left menu, click Tasks. My Tasks opens. You are in the right place when you see the boxes Overdue, Due Today, This Week and Completed at the top.
- Click the row Record their decision · NAME (click Due Today or Overdue at the top if you do not see it). A short preview opens under it.
- Click Open Full View.
- Click the green Mark Complete button at the bottom right of the full view.
If the task is already gone when you come back, pdrOS closed it because the step happened.
The choice is made once; changing it later does nothing. If you set None by mistake, tell us the RO number at once (in the left menu, click Support, then the orange Support Ticket button). If the fee was already paid, the case has already closed and the customer got the review ask; we reopen it on our side. To find the RO number:
- In the left menu, click Contacts.
- Click in the search box at the top of the list and type the customer's last name.
- Click the customer's name in the list. Their contact profile opens. You are in the right place when you see the customer's name at the top left and their texts in the middle.
- At the top of the left side, under Tags, read the number next to RO# DO NOT EDIT THIS!!. pdrOS sets it; never change it.
None: report only
Outcome becomes Report only. Then pdrOS checks Fee paid. With the fee already paid, the case closes and the customer gets the review ask. With the fee at No, the case sits at 6.1 Fee due with the Fee not paid · NAME task until you set Fee paid:
- In the left menu, click Contacts.
- Click in the search box at the top of the list and type the customer's last name or RO number.
- Click the customer's name in the list. Their contact profile opens. You are in the right place when you see the customer's name at the top left and their texts in the middle.
- On the left side of the contact profile, scroll down to the folder CASE and click the folder's name to open it.
- Click the box under Fee paid ⚡ and pick how it was paid: Square, Venmo, Check, Cash or Waived.
- Click the blue Save button at the bottom of the left side.
- In the left menu, click Tasks. My Tasks opens.
- Click the row Fee not paid · NAME. A short preview opens under it.
- Click Open Full View.
- Click the green Mark Complete button at the bottom right of the full view.
If the task is already gone when you come back, pdrOS closed it because the step happened.
If the money came by check, cash or Venmo, also record it on the invoice (Venmo as Other), so its reminders stop. The steps are in Step 10: the fee and the close. If you picked Waived, void the invoice (same page).
Shop or Carrier: you take it on
Within a minute: 1. The case is marked engaged and Claim side (folder CASE) is set to Claimant (pdrOS does this itself, whatever was picked at signup). 2. The customer gets "We'll take it on from here: John Hayduk is preparing the demand and I'll keep you posted at every step." 3. You get the task Send the demand · inspection · NAME. 4. If the Date of Loss is known and there is no Statute deadline yet, the deadline is set to two years after the date of loss. The customer gets the deadline text, and you will get alerts 14 days and 3 days before the deadline. (Date of Loss is in folder FORM | Repair Authorization; Statute deadline is in folder CARRIER & APPRAISER.)
The demand on an inspection
Against the carrier
Make the demand and upload it to RTA or demand PDF. Type the claim number and the adjuster's email, then set Send demand to Send it now. From here it runs like a diminished value case (the demand pack, the demand chase, counters). One difference: no settlement summary goes to the customer.
You can also start from the task. In the left menu, click Tasks. Click the row Send the demand · inspection · NAME, then Open Full View. Click the link under WHERE (after the words "Open the case"). The contact profile opens in a new browser tab. Then start at step 4.
- In the left menu, click Contacts.
- Click in the search box at the top of the list and type the customer's last name or RO number.
- Click the customer's name in the list. Their contact profile opens. You are in the right place when you see the customer's name at the top left and their texts in the middle.
- On the left side of the contact profile, scroll down to the folder Insurance Info and click the folder's name to open it.
- Look at Claim #. If it is empty, click in the box under Claim # and type the claim number.
- Scroll down to the folder FORM | Repair Authorization and click the folder's name to open it.
- Look at Date of Loss. If it is empty, click the box under Date of Loss and pick the accident day in the calendar that opens.
- Scroll up to the folder CASE and click the folder's name to open it.
- In RTA or demand PDF, click Click to upload.
- Pick your demand on your computer and click Open.
- Scroll down to the folder CARRIER & APPRAISER and click the folder's name to open it.
- Look at Adjuster name. If it is empty, click in the box under Adjuster name and type the adjuster's name (the email greets them by it).
- Look at Adjuster email. If it is empty or wrong, click in the box under Adjuster email and type the adjuster's email.
- Click the blue Save button at the bottom of the left side.
- Scroll up to the folder CASE (just above CARRIER & APPRAISER) and go to the top of the folder, where the Send switches are.
- Click the box under Send demand ⚡ and pick Send it now from the list.
- Click the blue Save button at the bottom of the left side.
- In the left menu, click Tasks. My Tasks opens.
- Click the row Send the demand · inspection · NAME. A short preview opens under it.
- Click Open Full View.
- Click the green Mark Complete button at the bottom right of the full view.
If the task is already gone when you come back, pdrOS closed it because the step happened.
If Send demand comes back Not sent (see task), the ⚠️ Demand not sent task names what is missing. Fix it with the steps under If it will not send in Step 4: the RTA.
Against the shop
You send your letter to the shop yourself. Then set Send demand to I sent it myself (or pick the day in RTA or demand sent date). pdrOS only moves the case to 3.1 and writes the note "Letter to the shop sent by John himself"; no chase, no text to the customer.
- In the left menu, click Contacts.
- Click in the search box at the top of the list and type the customer's last name or RO number.
- Click the customer's name in the list. Their contact profile opens. You are in the right place when you see the customer's name at the top left and their texts in the middle.
- On the left side of the contact profile, scroll down to the folder CASE and click the folder's name to open it.
- Look at the top of folder CASE, where the Send switches are.
- Click the box under Send demand ⚡ and pick I sent it myself from the list.
- Click the blue Save button at the bottom of the left side.
Or pick the date instead:
- In the left menu, click Contacts.
- Click in the search box at the top of the list and type the customer's last name or RO number.
- Click the customer's name in the list. Their contact profile opens. You are in the right place when you see the customer's name at the top left and their texts in the middle.
- On the left side of the contact profile, scroll down to the folder CARRIER & APPRAISER and click the folder's name to open it.
- Click the box under RTA or demand sent date and pick the day you sent the letter in the calendar that opens.
- Click the blue Save button at the bottom of the left side.
Either way, close the task Send the demand · inspection · NAME:
- In the left menu, click Tasks. My Tasks opens.
- Click the row Send the demand · inspection · NAME. A short preview opens under it.
- Click Open Full View.
- Click the green Mark Complete button at the bottom right of the full view.
If the task is already gone when you come back, pdrOS closed it because the step happened.
After the letter, pdrOS sends nothing more for you: you deal with the shop yourself. When the shop gives you a figure, type it in Their number; as on any case, that gives you the task Negotiate · NAME and a text:
- In the left menu, click Contacts.
- Click in the search box at the top of the list and type the customer's last name or RO number.
- Click the customer's name in the list. Their contact profile opens. You are in the right place when you see the customer's name at the top left and their texts in the middle.
- On the left side of the contact profile, scroll down to the folder CARRIER & APPRAISER and click the folder's name to open it.
- Click in the box under Their number ⚡ and type their figure (numbers only, no dollar sign).
- Click the blue Save button at the bottom of the left side.
Settlement on an inspection
Typing the Award amount and picking the Award signed date settle it. The customer gets the Settled text and email, and Outcome is set to Settled. No customer summary goes (Send summary is refused on this type). Setting Fee paid to Venmo, Check, Cash, Square or Waived then closes the case and sends the review ask.
- In the left menu, click Contacts.
- Click in the search box at the top of the list and type the customer's last name or RO number.
- Click the customer's name in the list. Their contact profile opens. You are in the right place when you see the customer's name at the top left and their texts in the middle.
- On the left side of the contact profile, scroll down to the folder OUTCOME and click the folder's name to open it.
- Click in the box under Award amount ⚡ and type the amount (numbers only, no dollar sign).
- Click the box under Award signed date ⚡ and pick the day the award was signed in the calendar that opens.
- Click the blue Save button at the bottom of the left side.
When the fee is in:
- In the left menu, click Contacts.
- Click in the search box at the top of the list and type the customer's last name or RO number.
- Click the customer's name in the list. Their contact profile opens. You are in the right place when you see the customer's name at the top left and their texts in the middle.
- On the left side of the contact profile, scroll down to the folder CASE and click the folder's name to open it.
- Click the box under Fee paid ⚡ and pick how it was paid: Square, Venmo, Check, Cash or Waived.
- Click the blue Save button at the bottom of the left side.
- If you have the task Fee not paid · NAME: in the left menu, click Tasks. My Tasks opens.
- Click the row Fee not paid · NAME. A short preview opens under it.
- Click Open Full View.
- Click the green Mark Complete button at the bottom right of the full view.
If the task is already gone when you come back, pdrOS closed it because the step happened.
If the money came by check, cash or Venmo, also record it on the invoice (Venmo as Other), so its reminders stop. The steps are in Step 10: the fee and the close. If you picked Waived, void the invoice (same page).
Did this page not match what you see? Ask the support chat or open a support ticket. We change the page, not you.