Where things live
Answers: what is on the screen? what is each item in the left menu for? what are the three parts of a contact profile? where is the Save button? how do I read the arrows in tables? can I use it on my phone?
pdrOS opens in your web browser at app.bc3d.agency; you sign in with your email and password. It is one screen with a menu down the left. You use up to nine items in that menu. Two of them most of the day, the rest now and then. Almost everything you do for a case happens on one customer's screen, the contact profile.
The left menu
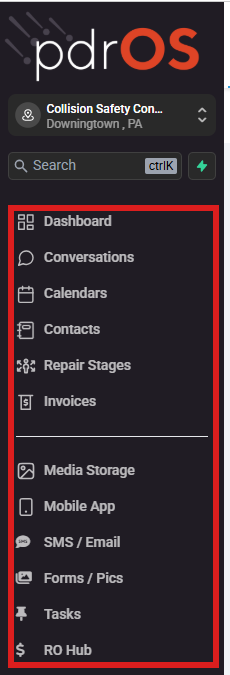
The left menu is the dark menu down the left edge of every screen. Click an item to open its page.
Every day
- Tasks: your to-do list across every case. Each task gives the facts, the steps and a link to the customer's contact profile. When a task is done, you click its green Mark Complete button here.
- Contacts: every customer. Search one and click their name to open their contact profile (below). Along the top of the list are saved lists. Money out shows every hired case whose Fee paid is still No.
Several times a week
- Conversations: every text and email in one inbox. Customers, and separately the adjusters, appraisers and shops pdrOS emailed for you (each of those under their own name). When your phone says someone "replied by email about one of your cases", you read it here.
- Calendars: your inspections at a glance. Look here, never book here. You book, move and cancel from the customer's contact profile (the Appointments icon on the right edge).
- Repair Stages: the case board. At the top left, pick the pipeline APPRAISAL CASES. Each open case is a card in the column of its stage, 1.1 to 6.3. Look only: never drag a card; pdrOS moves them.
When money or paper comes up
- Invoices: every fee invoice pdrOS sent through Square, with its status (for example Due In 1 Day(S), Overdue, Paid, Void). Recording a check or Venmo payment, voiding (only when you waive a fee), refunds, and the pay link if a customer lost it.
- RO Hub: two tabs across the top (other tabs may show; you do not need them). RO List shows every case in a list. Its search box finds a case by name, RO number, VIN, claim number, vehicle, phone, email or insurer. Double-click a row: RO Hub opens in a new browser tab with that case loaded. There, the Contacts button opens the customer's contact profile and Docs opens the documents. Repair Order shows one case: type the RO number (your case number) in the box under RO #: (it reads Enter repair order number) and click Search. Then click the small Docs button, to the right of the Contacts button: a window lists the case's main PDFs (Documents).
- Forms / Pics: another way to the same PDFs as Docs (the signed agreement, the signup sheet, the photo report), by RO number. You rarely need it (Documents).
When you need us
- Support: the support chat and, under it, the orange Support Ticket button for a person, then this guide, with a Search box at the top (Getting help).
Items you can skip: Dashboard, Mobile App (only to install the phone app once) and SMS / Email. Dashboard is the top item; it shows nothing you need. Media Storage holds pictures and files you upload for your own use; nothing in it starts work. Settings are ours; you will not see them.
The contact profile: one customer's screen
To open one:
- In the left menu, click Contacts.
- Click in the search box at the top of the list and type the customer's last name or RO number.
- Click the customer's name in the list. Their contact profile opens. You are in the right place when you see the customer's name at the top left and their texts in the middle.
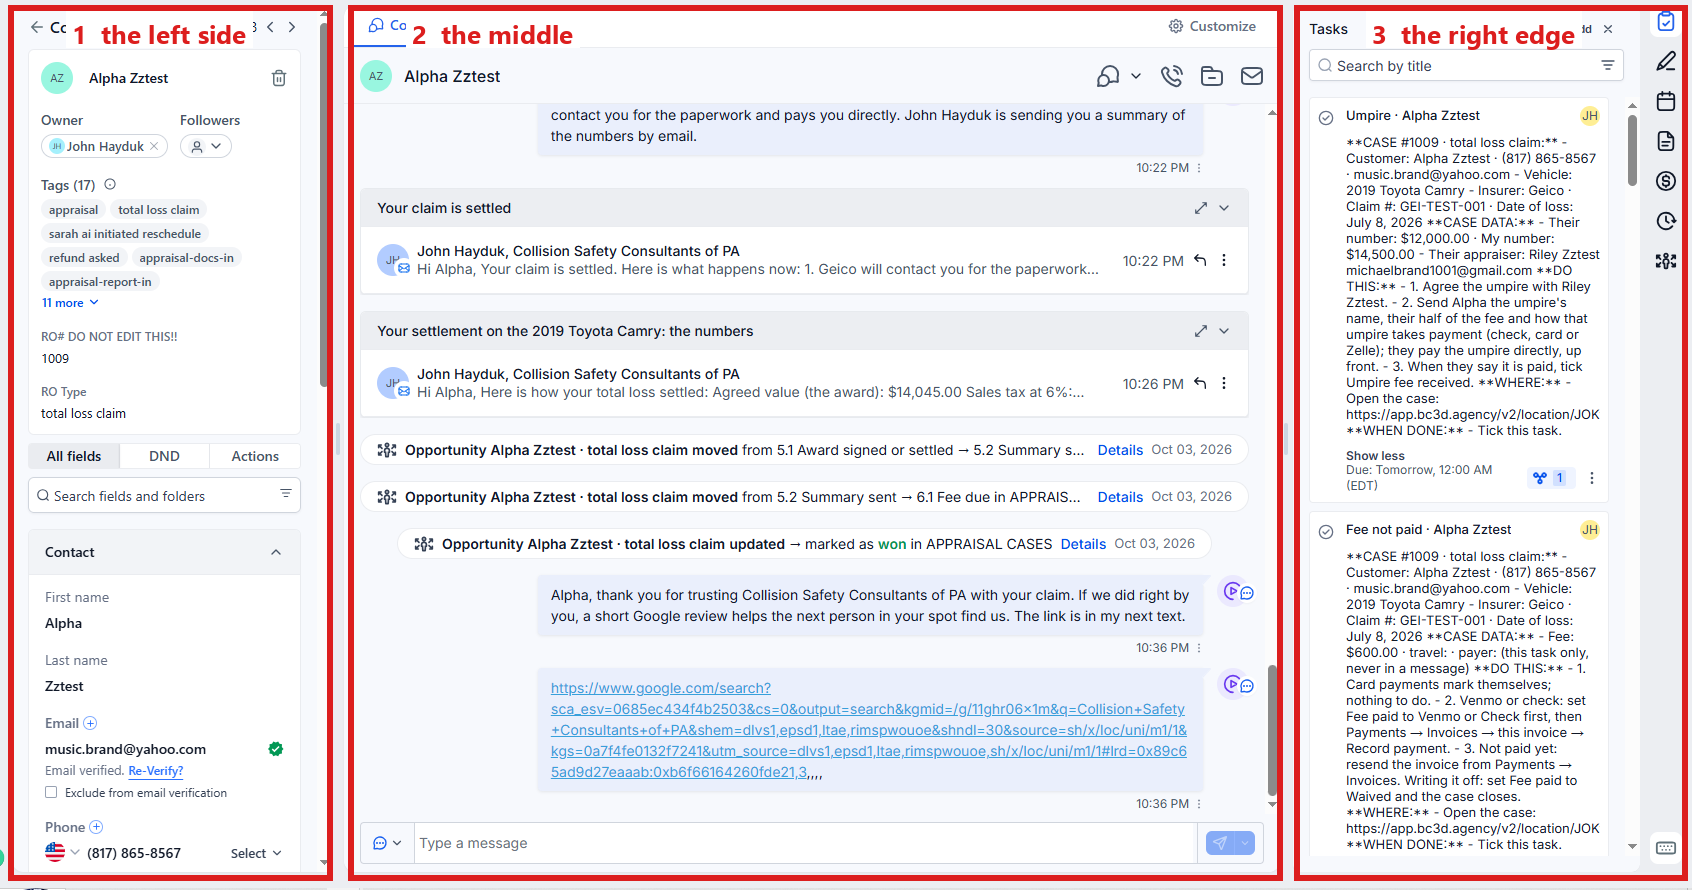
The contact profile has three parts: the left side, the middle and the right edge.
1. The left side: the customer and the folders
From the top down:
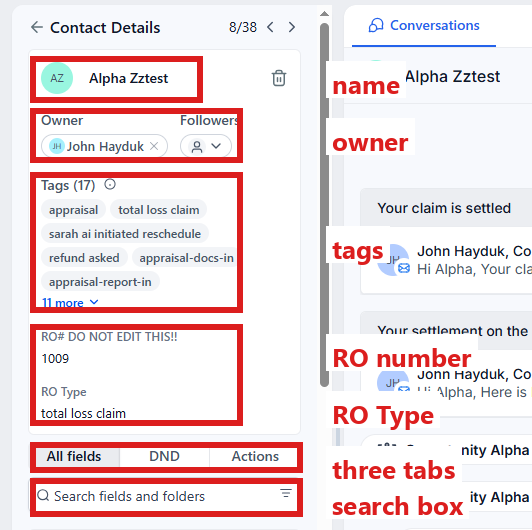
- The customer's name, with Owner and Followers under it.
- Tags, under the name. Small labels pdrOS puts on the contact profile as the case moves (for example appraisal-hired). You can look at them; you cannot add or remove them. A tag starts or stops work, so we manage them for you.
- The RO number (RO# DO NOT EDIT THIS!!) and RO Type, then three tabs (All fields, DND, Actions; stay on All fields) and the Search fields and folders box.
- The folders. A folder is a box of fields with its name at the top. Click a folder's name to open it; click it again to close it. If you can see its fields under the name, it is already open.
You have 15 folders, top to bottom:
- Contact: the RO number (RO# DO NOT EDIT THIS!!; pdrOS sets it, never change it), the vehicle (Customer Vehicle / Customer Signup Form), Customer Signup Notes, and the customer's phone and email.
- CASE: the case itself. At the very top, Case status (one sentence pdrOS writes), then the five Send switches (Send range, Send demand, Send our report, Send counter, Send summary). Below them: Claim side, the fee, the range, the documents the customer sends and your RTA.
- CARRIER & APPRAISER: the adjuster, the other appraiser, your number and theirs, the counter, the umpire, the deadlines, the customer's upload link.
- OUTCOME: the award, the settlement figures, the release, and Outcome.
- SHORT PAY & INSPECTION: the estimate totals, the inspection location and travel fee, and Engaged against.
- Estimates: Upload Estimate Doc Here ⚡ (your report or rewrite).
- Supplements: Supplement #1 Upload Doc Here ⚡ (their report).
- Insurance Info: Insurance Company, Deductible, Claim #.
- FORM | Repair Authorization: Repair Authorization Form PDF (the signed agreement), VIN, Date of Loss.
- REPAIR STATUS: RO Type, the kind of case.
- FORM LINKS: REPAIR AUTHORIZATION LINK, the customer's agreement link.
- General Info: the customer's mailing address. You rarely need it.
- Pics To Email PDF: Damage Images PDF, the photo report as a PDF.
- Pics To Email HTML: Damage Images HTML, the photo report as a web page.
- FORM | Customer Signup: Customer Signup Form PDF.
Your own four come right after Contact: CASE, CARRIER & APPRAISER, OUTCOME and SHORT PAY & INSPECTION. The rest sit below them. Every field, folder by folder, is in Every field.
2. The middle: the conversation
Every text, email and note with this customer, oldest at the top, newest at the bottom. It includes what pdrOS and Sarah sent for you.
At the very bottom is the message box, where you write a text or an email yourself. At its left end, a small button with a down arrow picks SMS (a text) or Email. The paper-plane button at its right end sends.
3. The right edge: the icons
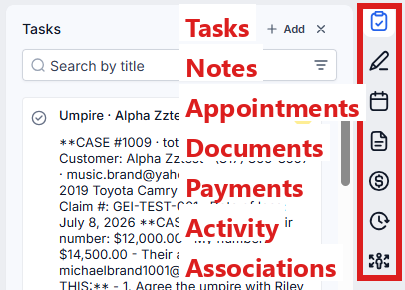
A narrow column of small icons runs down the far right edge. Hold the mouse over an icon to see its name. Click it and its panel opens beside it. Top to bottom:
- Tasks (a clipboard with a check mark): this customer's tasks. Add one, change its date, or give it to Sharon.
- Notes (a pen): the case's timeline. Every note pdrOS wrote, newest at the top.
- Appointments (a calendar): book, move or cancel an inspection, or mark a no show. The only place to book.
- Documents (a page): every file on this customer, with its date.
- Payments (a dollar sign): this customer's invoices and payments.
- Activity (a clock): a list of what happened on this contact profile. You rarely need it.
You may see one or two more icons. You do not need them.
On your phone
The phone app (it is called LeadConnector in the App Store and Google Play; sign in with the same email and password) shows Conversations, Contacts, Calendars and your tasks. Alerts come to your phone as plain texts either way, and the Tasks page is easiest on the computer.
The blue Save button
When you change a field, a bar appears at the bottom of the left side: "1 change made", a Cancel button and a blue Save button. Click Save after every change. Nothing happens and nothing is sent until you click it; Cancel throws the change away.
If you change a field and no blue Save button appears, stop and tell us: Auto-Save has been switched on. Never click Enable auto-save (under the three dots next to the blue Save button).
Reading the arrows in tables
Tables in this guide shorten a route with arrows. Arrows mean: click this, then this.
For example, Contacts → the customer → folder CASE → Send demand means:
- In the left menu, click Contacts.
- Click in the search box at the top of the list and type the customer's last name or RO number.
- Click the customer's name in the list.
- On the left side of the contact profile, scroll down to the folder CASE and click the folder's name to open it.
- Find Send demand.
Two more you will meet:
- Contacts → the customer → right edge Notes: open the customer's contact profile, then click the Notes icon on the far right edge.
- Tasks → the task → Open Full View: in the left menu, click Tasks, click the task's row, then click Open Full View.
Did this page not match what you see? Ask the support chat or open a support ticket. We change the page, not you.