Post-repair inspection: booking the visit
Answers: how does a customer book an inspection? how do I book one for them? how do I move, cancel or mark a no-show? how do I send the agreement before the visit?
An inspection at the office is booked by the customer from the link pdrOS texts them. Or you book it from the Appointments icon on the right edge of their contact profile. A travel inspection is booked by you after a call. Confirmations, the day-before reminder and the signing request go by themselves.
Office or travel
The signup form asks Inspection location. The answer is kept in folder SHORT PAY & INSPECTION on the contact profile, field Inspection location (Our office or Travel). - Our office: the customer gets the booking text ("let's book your inspection. We meet you with the car in the main lobby of 101 Woodbine Rd, Downingtown, PA 19335; pick any time that suits you with the link in my next text. Would you rather we come to you? Reply TRAVEL") and the booking link, and the email "Book your post-repair inspection". - Travel: $600 is added as Travel fee (same folder); the customer gets "You asked us to come to you for the inspection: John Hayduk will call you to agree a day, a time and the address"; you get the task Call to book the inspection · NAME.
The booking page
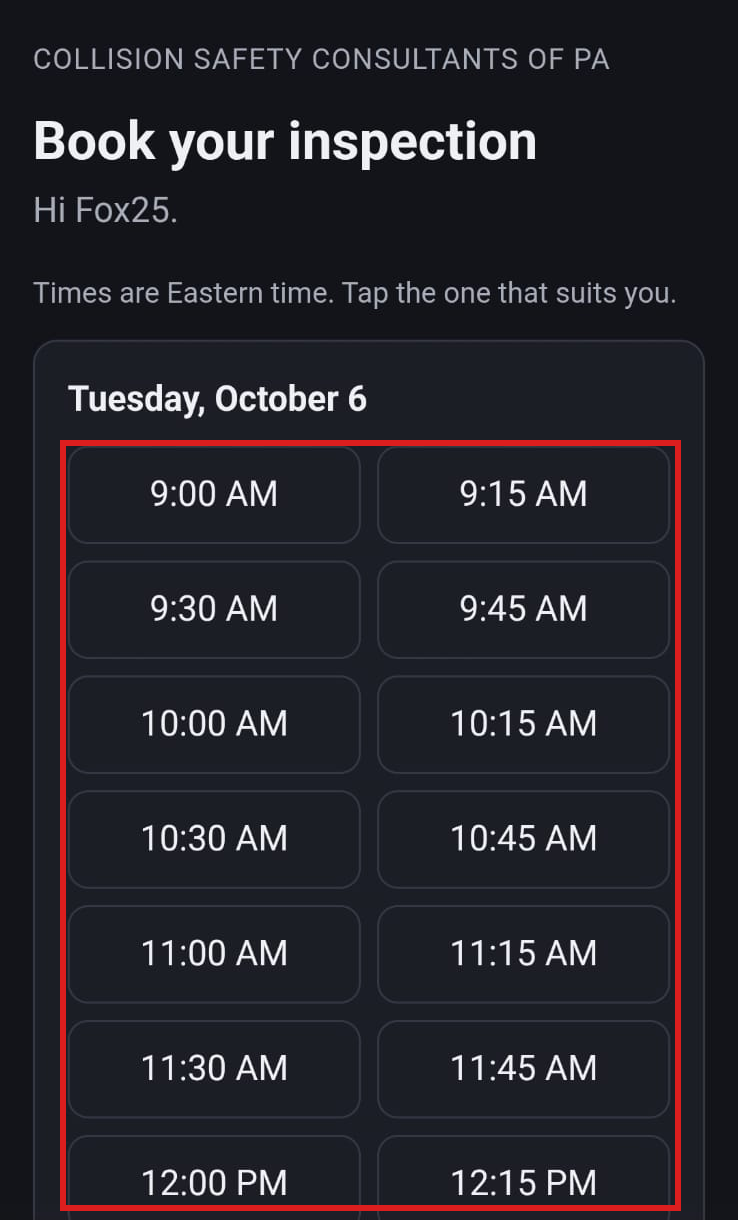
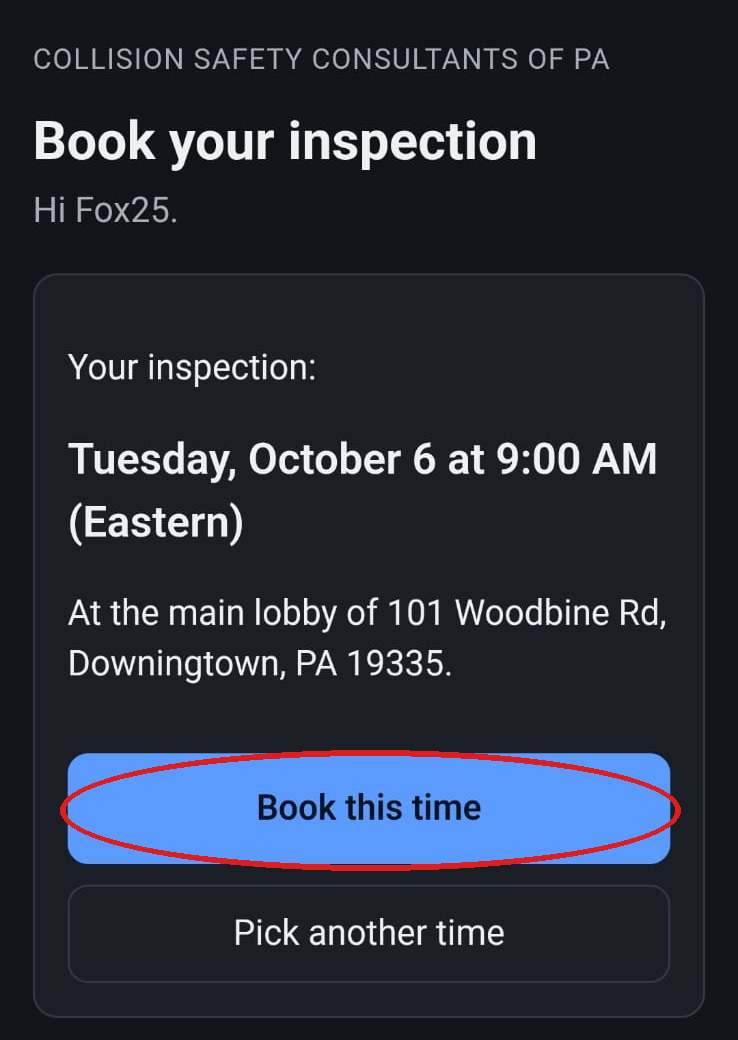
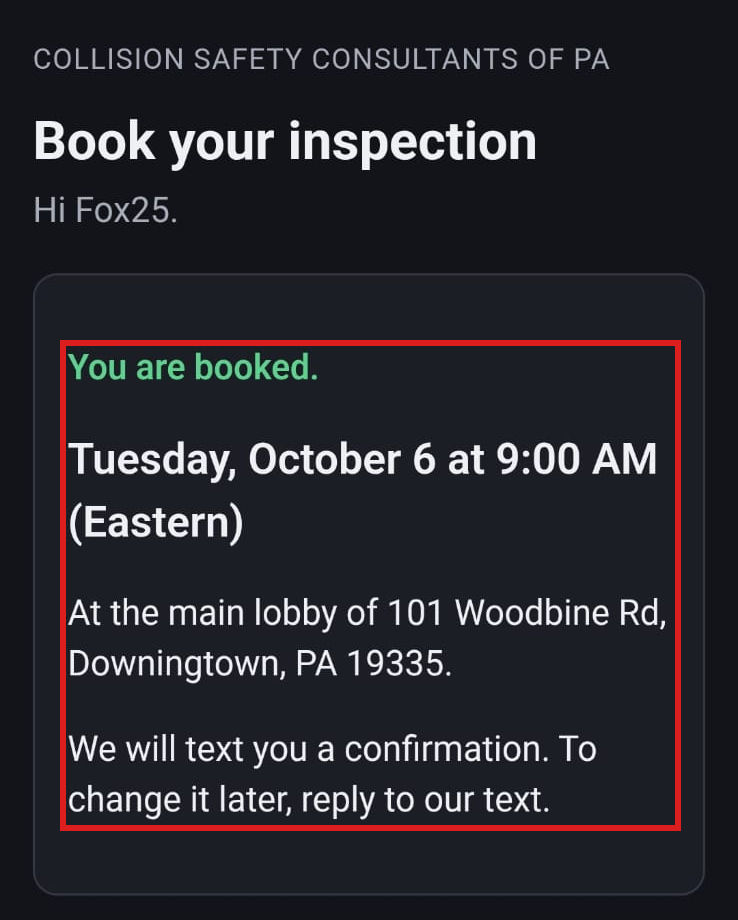
The customer's link opens a page headed "Book your inspection" with "Hi NAME." It shows the free times (Monday to Friday, 9 to 4, from tomorrow, four weeks out) under "Times are Eastern time. Tap the one that suits you." They tap a time, read "Your inspection: … At the main lobby of 101 Woodbine Rd, Downingtown, PA 19335." and tap Book this time (or Pick another time). The page then says "You are booked. We will text you a confirmation. To change it later, reply to our text." The booking lands on their own contact profile.
Booking it yourself
Use this for travel inspections and for any customer who would rather you did it. Always book from the customer's contact profile.
You can also start from the task. In the left menu, click Tasks. Click the row Call to book the inspection · NAME, then Open Full View. Click the link under WHERE (after the words "Open the case"). The contact profile opens in a new browser tab. Then start at step 4.
- In the left menu, click Contacts.
- Click in the search box at the top of the list and type the customer's last name or RO number.
- Click the customer's name in the list. Their contact profile opens. You are in the right place when you see the customer's name at the top left and their texts in the middle.
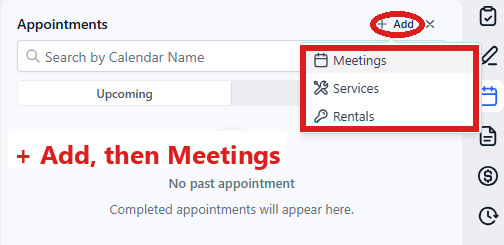
- On the far right edge of the contact profile, click the Appointments icon (a calendar). Hold the mouse over the small icons to see their names. You are in the right place when the panel's title reads Appointments.
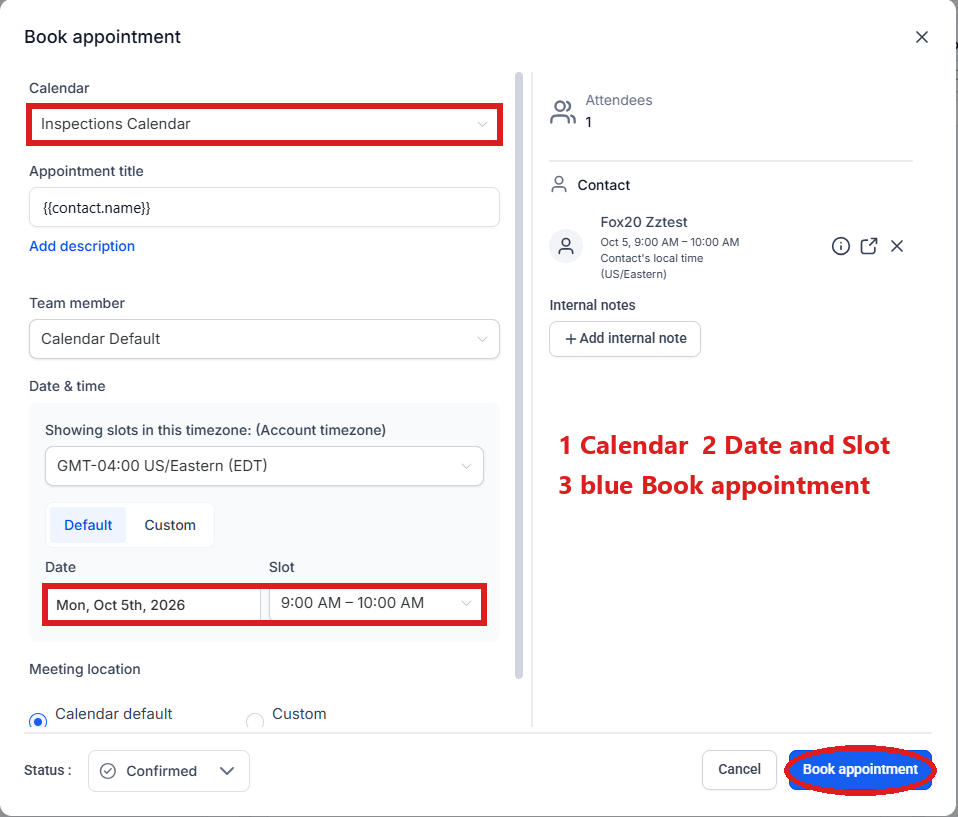
- Click + Add at the top of the panel. A small menu opens; click Meetings. The Book appointment window opens.
- Under Calendar, make sure it reads Inspections Calendar (if not, click the box and pick it).
- Under Date & time, click the box under Date and pick the day.
- Click the box under Slot and pick a free time.
- Click the blue Book appointment button at the bottom right.
If you booked it from the task Call to book the inspection · NAME, close the task:
- In the left menu, click Tasks. My Tasks opens. You are in the right place when you see the boxes Overdue, Due Today, This Week and Completed at the top.
- Click the row Call to book the inspection · NAME (click Due Today or Overdue at the top if you do not see it). A short preview opens under it.
- Click Open Full View.
- Click the green Mark Complete button at the bottom right of the full view.
If the task is already gone when you come back, pdrOS closed it because the step happened.
Calendars in the left menu is for looking only. In the left menu, click Calendars and your week of inspections shows. Never book there by typing a name: it makes a second customer with no case. See Calendar.
What happens when it is booked, within a minute
- The case moves to 2.1 Inspection booked; Case status (folder CASE) reads "Your inspection is booked for [date time] at our office."
- The customer gets the confirmation text ("Meet us in the main lobby of 101 Woodbine Rd… unless we agreed to come to you") and the email "Your inspection is booked".
- If they have not signed the agreement: "One thing before we meet, please read and sign the inspection agreement" and the agreement link.
- The booking reminders stop.
If nobody books
Reminders with the booking link go on day 2 and day 12. You get Call to book the inspection · NAME on day 5 and Nothing after three weeks · close it? · NAME on day 19. A booking stops them. For the day-5 task, call the customer, then book it and close the task with the steps in Booking it yourself above. For the day-19 task, call once more or close the case as Went quiet (steps in Step 1: the documents), then mark the task complete.
The day before
The customer gets "your inspection is tomorrow, [date time], in the main lobby of 101 Woodbine Rd… Bring the car and the repair paperwork." If still unsigned, the signing text and link again.
One hour before, still unsigned
Your phone gets "NAME arrives at [time] and has not signed the agreement. Have them sign on your phone: [link]". When they arrive, tap the link in that text and hand them your phone to sign.
Moving the time
- In the left menu, click Contacts.
- Click in the search box at the top of the list and type the customer's last name or RO number.
- Click the customer's name in the list. Their contact profile opens. You are in the right place when you see the customer's name at the top left and their texts in the middle.
- On the far right edge of the contact profile, click the Appointments icon (a calendar). You are in the right place when the panel's title reads Appointments.
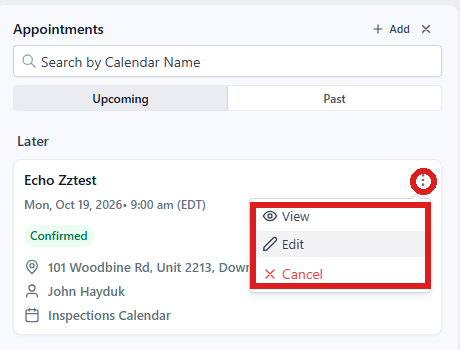
- Click the three dots at the right of the appointment and pick Edit. The Edit details panel opens.
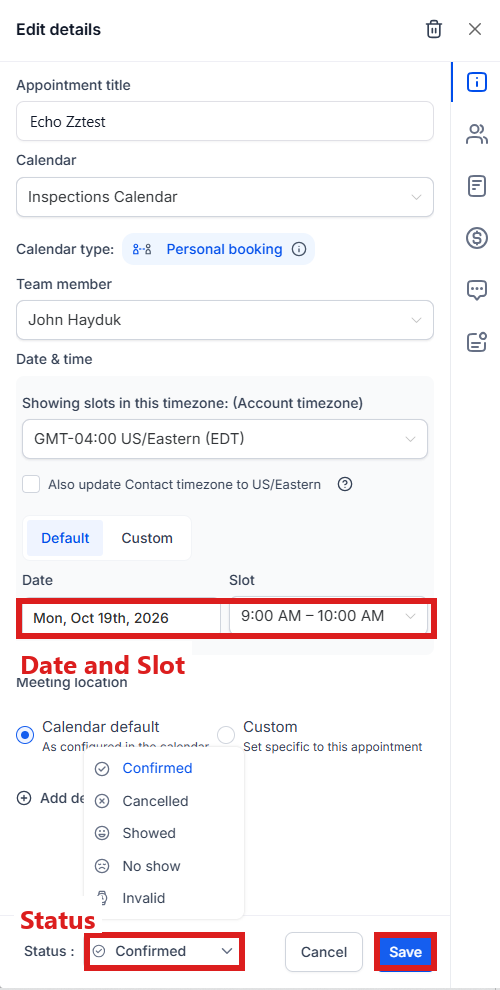
- Under Date & time, click Date and pick the new day, then click Slot and pick the new time.
- Click Save at the bottom right of the panel.
The customer gets a fresh confirmation for the new time, and the day-before reminder follows the new time.
Cancel or no show
- In the left menu, click Contacts.
- Click in the search box at the top of the list and type the customer's last name or RO number.
- Click the customer's name in the list. Their contact profile opens. You are in the right place when you see the customer's name at the top left and their texts in the middle.
- On the far right edge of the contact profile, click the Appointments icon (a calendar). You are in the right place when the panel's title reads Appointments.
- To cancel: click the three dots at the right of the appointment and pick Cancel.
To mark a no show instead:
- Click the three dots at the right of the appointment and pick Edit. The Edit details panel opens.
- At the bottom of the panel, click the box next to Status and pick No show.
- Click Save at the bottom right.
Within a minute: 1. The customer gets "your inspection did not go ahead. No problem: pick a new time with the link in my next text, or reply TRAVEL", and the booking link. 2. Your phone gets "NAME cancelled or missed the inspection". 3. The case goes back to 1.1 and the booking reminders start again.
A new booking runs the confirmations again.
Signing before the visit
If they want to sign before booking, text them the agreement link from their contact profile:
- In the left menu, click Contacts.
- Click in the search box at the top of the list and type the customer's last name or RO number.
- Click the customer's name in the list. Their contact profile opens. You are in the right place when you see the customer's name at the top left and their texts in the middle.
- On the left side of the contact profile, scroll down to the folder FORM LINKS and click the folder's name to open it. (If you already see its fields, it is open: clicking its name again closes it.)
- Click in the box under REPAIR AUTHORIZATION LINK. Do not type anything in this box; you are only copying.
- Press Ctrl and A together to select the whole link (on a Mac, Cmd and A).
- Press Ctrl and C together to copy it (on a Mac, Cmd and C).
- At the bottom of the middle of the contact profile is the message box. At its left end, click the small button with a down arrow and pick SMS.
- Click in the box and press Ctrl and V together to paste the link (on a Mac, Cmd and V). Send the link alone, with no words around it.
- Click the paper-plane button at the right end to send.
If a blue Save button appeared at the bottom of the left side after step 5, you changed the link by mistake: do not click it. Click Cancel next to the blue Save button; the field goes back to what it was.
When they sign, the case records the signature and sends the invoice; the booking confirmations then come without the signing request.
A booking by someone with no case
If a name is typed straight into the Calendar, the person gets nothing and you get "NAME booked an inspection but has no appraisal case. Open their contact and send them the Appraisal Case Signup link". To do that:
- Press Ctrl and T together (on a Mac, Cmd and T). A new browser tab opens.
- Click your bookmark named "Signup" (see Your three links). Your signup page opens.
- Click in the address bar at the top of the browser.
- Press Ctrl and A together to select the link (on a Mac, Cmd and A).
- Press Ctrl and C together to copy it (on a Mac, Cmd and C).
- Close that tab. You are back in pdrOS.
- In the left menu, click Contacts.
- Click in the search box at the top of the list and type the name from the text.
- Click the person's name in the list. Their contact profile opens. You are in the right place when you see their name at the top left.
- At the bottom of the middle of the contact profile is the message box. At its left end, click the small button with a down arrow and pick SMS.
- Click in the box and press Ctrl and V together to paste the link (on a Mac, Cmd and V). Send the link alone, with no words around it.
- Click the paper-plane button at the right end to send.
Other words for this
post-repair inspection = PRI, a look at the repair, a quality inspection; booking = the appointment, the visit; travel = we come to you, a mobile inspection.
Did this page not match what you see? Ask the support chat or open a support ticket. We change the page, not you.