The signup form: how every case starts
Answers: how do I start a new case? how do I fill the signup form? what happens after I press Submit? how do I find the new customer and check what the form saved?
A case starts when the Appraisal Case Sign-Up Form is submitted. You fill it with the customer on the phone, or the customer fills it from the link you send. Two minutes later the case exists, the customer has been welcomed and asked for what you need, and Sarah is answering their texts.
The form is a web page of its own, not part of the contact profile. It opens from your signup link, on your phone or your computer.
When you fill it
You have the customer on the phone. This is the normal way for a caller.
- Open your signup link: click your signup bookmark on your computer, or tap the "Signup" icon on your phone's home screen. (To set these up, see Your three links.) The form opens in your browser. You are in the right place when you see the boxes First Name, Last Name, Email and Phone at the top.
- Fill the boxes as you talk, from the top down. Each box is explained below.
- Ask "OK to text you updates?" and check the consent box only if they say yes (box 16 below).
- Click Submit at the bottom of the form.
When the customer fills it
Send them the plain signup link by text or email, and they fill it on their phone. They have no contact profile yet, so send it from your own phone or email. Copy the link from your bookmark, or from Your three links.
A customer referred by a shop already has their own link. Use that one, never the plain link, so the signup lands on their own contact profile. It is in the email pdrOS sent them. It is also in your task Call the referred customer: in the left menu, click Tasks, click the task's row, then click Open Full View. The full steps are in Shop referrals.
The fields, in order
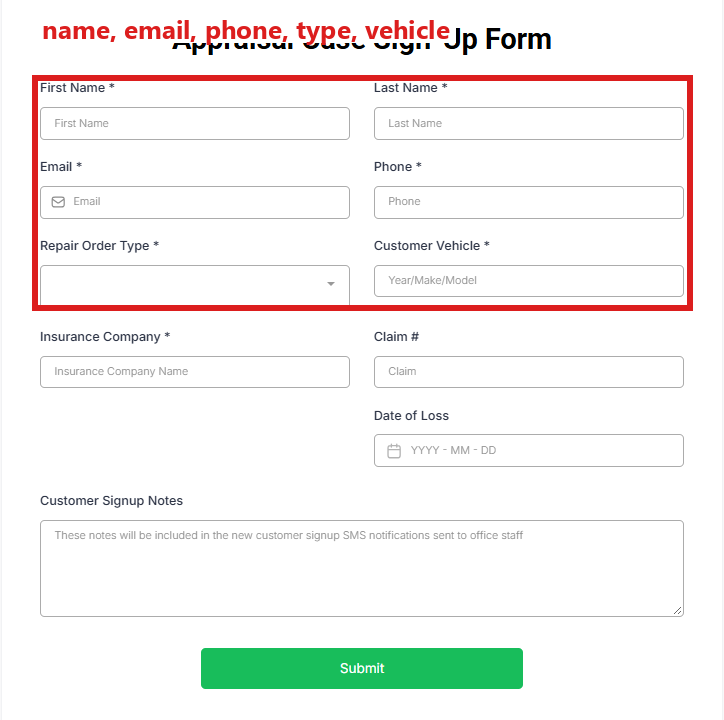
The form starts short: the names, the type, the vehicle, the insurer and claim number, Date of Loss, the notes box and Submit. The moment you pick the Repair Order Type, the boxes that case type needs appear under it. A total loss shows the claim side, the carrier's offer and the other appraiser's details. A short pay shows the two estimate totals. An inspection shows the inspection location. A box you never see on a given type is not needed for it.
- First Name, Last Name, Email, Phone (required). Type the phone with the area code.
- Repair Order Type (required): total loss claim, diminished value, short pay or post-repair inspection. The list also shows hail, collision and other body-shop jobs from another part of pdrOS. Pick only the four appraisal types. (On the contact profile this answer is called RO Type.)
- Customer Vehicle (required): year, make, model.
- Insurance Company (required) and Claim # if they have it.
- Date of Loss: the accident date. On a diminished value case, and on an inspection with Claim side Claimant, pdrOS turns it into the statute deadline and texts the customer the date.
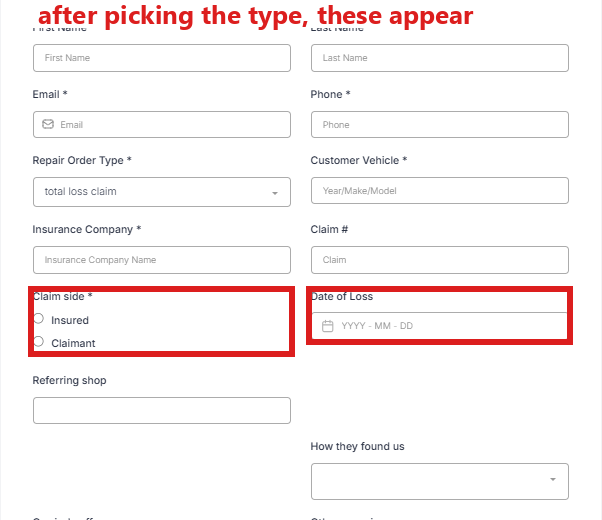
These appear once the type is picked, each only on the types that need it (the notes box at the end is always there):
- Claim side (required), the two round buttons Insured and Claimant: Insured when it is the customer's own insurer (every total loss); Claimant when the other driver's insurer pays (diminished value). On a post-repair inspection: Insured when their own insurer paid for the repair, Claimant when the other driver's insurer paid. On a post-repair inspection, if you later go after the other driver's insurer, pdrOS changes this to Claimant for you.
- Referring shop (with the shop's contact and email boxes): the shop that sent the customer, if any. On a short pay the shop gets the upload email.
- How they found us.
- Carrier's offer: the insurer's number so far.
- Other appraiser name, Other appraiser email, Other appraiser phone if known (they can be typed later; the adjuster's details are typed on the contact profile, see Step 4: the RTA).
- Demand-by date if there is one.
- Shop estimate total, Carrier estimate total: short pay.
- Owner or Shop: who pays the fee.
- Inspection location: Our office or Travel (post-repair inspection only).
- Customer Signup Notes: anything you want kept with the case. It is copied to Customer Signup Notes (folder Contact) on their contact profile.
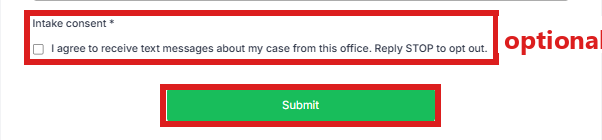
- Intake consent, the box I agree to receive text messages about my case from this office. Reply STOP to opt out. Ask "OK to text you updates?". Yes: check the box. It records their permission on their contact profile (Intake consent, folder CASE) and on the signup PDF. No: leave the box empty and submit. The first texts go out within two minutes, so stop them straight away: in the left menu, click Contacts, click in the search box at the top of the list and type the customer's last name, then click their name. At the top of the left side, click the DND tab (next to All fields) and check Text Messages; it saves by itself and stops every text to them. Then tell us the RO number (in the left menu, click Support, then the orange Support Ticket button) so we keep them on email only. The RO number is in the text your phone gets two minutes after you submit ("new [type] case #N").
When you click Submit, the page says "Thank you. We have your case".
What happens in the next two minutes
- pdrOS makes the customer's contact profile and gives the case its RO number. Your name goes in Appraiser (folder CASE). The signup PDF is saved in Customer Signup Form PDF (folder FORM | Customer Signup).
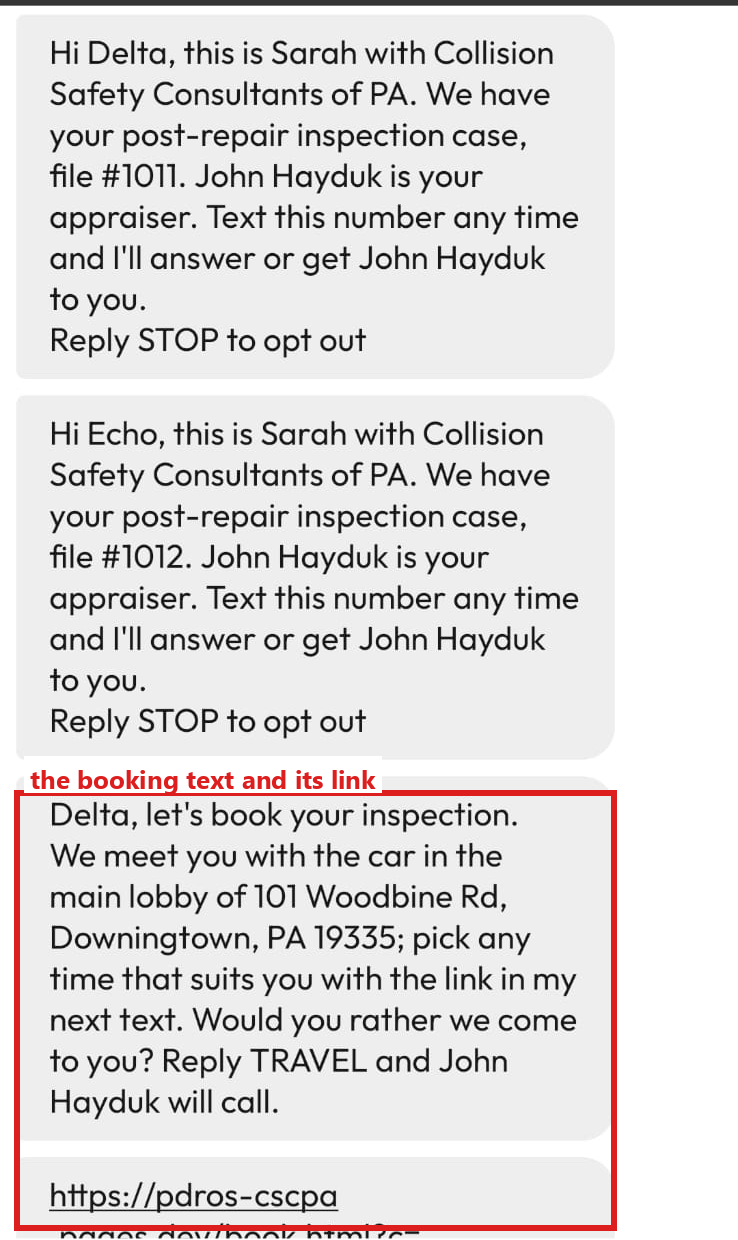
- The customer gets the welcome text ("this is Sarah with Collision Safety Consultants of PA. We have your [type] case, file #N. John Hayduk is your appraiser. Text this number any time") and the welcome email with the RO number.
- The request for that type goes. Total loss: the valuation report ask plus the upload link. Diminished value: invoice, mileage and photos plus the upload link. Short pay: a short text to the owner and the upload email to the shop. Inspection at the office: the booking text and link. Inspection with travel: a text saying you will call, and a task for you.
- Sarah is switched on for them.
- Your phone gets "new [type] case #N". N is the RO number.
- The case sits at stage 1.1; the documents or booking reminders start by themselves.
Your first task comes when there is something to do: documents in, a shop estimate to enter, or a travel inspection to book.
Find the new customer and check what the form saved
Two minutes after you submit, open their contact profile and check that the form landed.
- In the left menu, click Contacts.
- Click in the search box at the top of the list and type the customer's last name or RO number.
- Click the customer's name in the list. Their contact profile opens. You are in the right place when you see the customer's name at the top left and their texts in the middle.
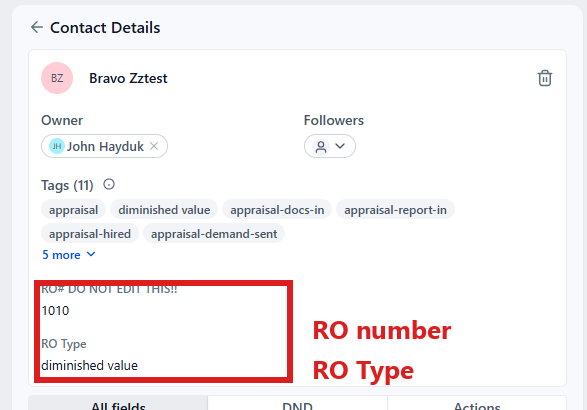
- Look at the top of the left side, under their name: the RO number is next to RO# DO NOT EDIT THIS!! (pdrOS sets it, so never change it), and RO Type is under it.
- On the left side of the contact profile, scroll down to the folder Contact and click the folder's name to open it. Check Phone and Email. Customer Vehicle / Customer Signup Form shows the vehicle.
- On the left side of the contact profile, scroll down to the folder REPAIR STATUS and click the folder's name to open it. RO Type shows the type you picked.
- On the left side of the contact profile, scroll up to the folder CASE and click the folder's name to open it. Check Claim side (Insured or Claimant), Fee payer (Owner or Shop) and Intake consent (checked if they said yes to texts). Appraiser shows your name.
You only looked, so there is nothing to save.
To see the signup sheet as a PDF: in the left menu, click RO Hub. Click in the box under RO #: at the top (it reads Enter repair order number), type the RO number (your case number) and click Search. Click the small Docs button, to the right of the Contacts button. The RO Documents window opens; click Customer Signup Form and it opens in a new browser tab.
If a typed answer is wrong (a claim number, say), open its folder (the table below says which), click in the box under the field and type it correctly. Then click the blue Save button at the bottom of the left side. If the type is wrong, see Wrong type, or the type changed later.
Where each answer lands
Arrows mean: click this, then this. Every folder is on the left side of the contact profile.
| On the form | On the contact profile |
|---|---|
| First Name, Last Name, Email, Phone | folder Contact (the name also shows at the top of the left side) |
| Repair Order Type | folder REPAIR STATUS → RO Type |
| Customer Vehicle | folder Contact → Customer Vehicle / Customer Signup Form |
| Insurance Company, Claim # | folder Insurance Info → Insurance Company, Claim # |
| Claim side (Insured / Claimant) | folder CASE → Claim side |
| Date of Loss | folder FORM | Repair Authorization → Date of Loss |
| Referring shop, contact and email | folder CASE → Referring shop, Referring shop contact, Referring shop email |
| How they found us, Carrier's offer | folder CASE → How they found us, Carrier's offer |
| Other appraiser name, Other appraiser email, Other appraiser phone, Demand-by date | folder CARRIER & APPRAISER → the fields with the same names |
| Shop estimate total, Carrier estimate total, Inspection location | folder SHORT PAY & INSPECTION → the fields with the same names |
| Owner / Shop (who pays the fee, when the form asks) | folder CASE → Fee payer |
| Customer Signup Notes | folder Contact → Customer Signup Notes |
| Intake consent | folder CASE → Intake consent |
If you picked the wrong type
See Wrong type, or the type changed later.
Did this page not match what you see? Ask the support chat or open a support ticket. We change the page, not you.