Documents: where every PDF lands
Answers: where is the signed agreement? where is the PDF the customer uploaded? where are the photos? how do I open a PDF? what are the Docs button, Forms / Pics and the Documents icon?
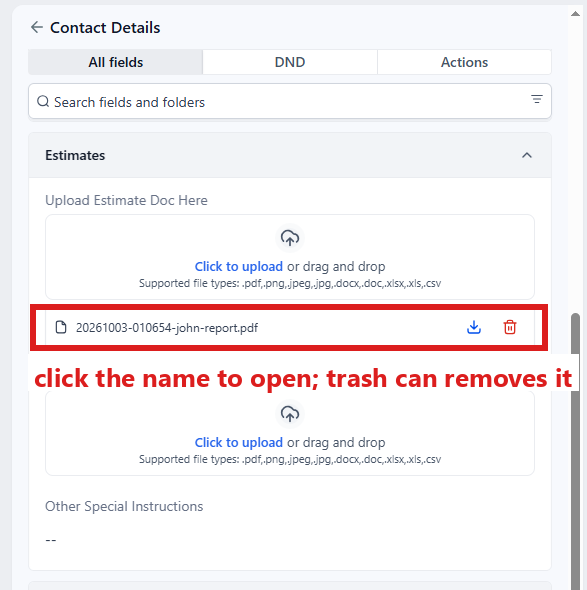
One window opens a case's PDFs: the Docs button in RO Hub. It lists only what this case has: the signed agreement, the signup sheet, your report, their report, the photo report, the files the customer uploaded and your RTA. Click a row and it opens. The uploaded files also sit in upload fields on the contact profile; click the file's name there and it opens too, which is handy when you are already on the contact profile.
One thing to know: on the contact profile, a field that holds a PDF's web address (for example Repair Authorization Form PDF) is a text box, not a clickable link. Clicking it does nothing useful. Uploaded files are different: their names are clickable.
Open a PDF: the Docs button in RO Hub
- In the left menu, click RO Hub. The Repair Order tab opens.
- Click in the box under RO #: at the top (it reads Enter repair order number), type the RO number and click Search. The case loads.
- Click the small Docs button, to the right of the Contacts button. A small window titled RO Documents opens, with a count at the top (for example "7 documents available"). It shows only documents this case has, in groups with a count each: FORMS & REPORTS, SCANS & ESTIMATES, SUPPLEMENT ESTIMATES, APPRAISAL CASE and PHOTO SETS.
- Click a row. The document opens in a new browser tab.
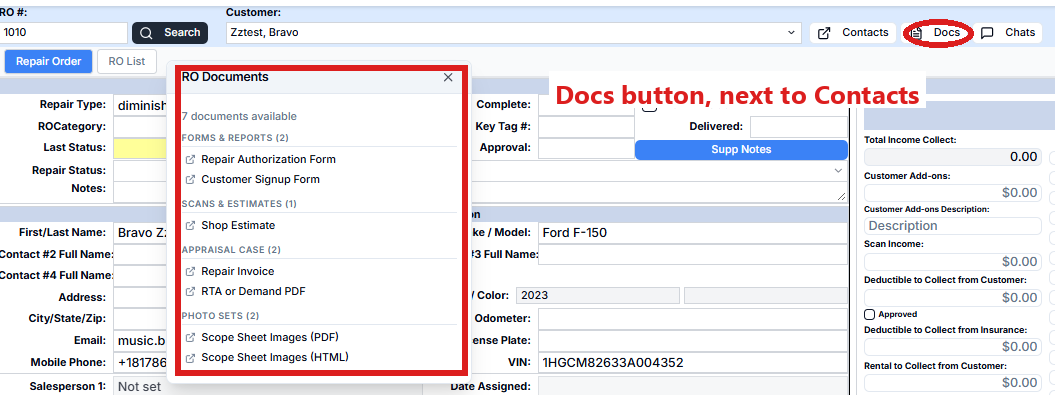
You are in the right place when the window's title reads RO Documents. The window uses the shop's names for some of your files:
| In the Docs window | What it is in your case |
|---|---|
| Repair Authorization Form | The signed agreement |
| Customer Signup Form | The signup PDF |
| Shop Estimate | Your report (the file in Upload Estimate Doc Here) |
| Supplement #1 Estimate (under SUPPLEMENT ESTIMATES) | Their report |
| Scope Sheet Images (PDF) and (HTML) | The customer's photo report |
| Carrier Valuation Report, Repair Invoice, Shop Estimate PDF, Carrier Estimate PDF (under Appraisal Case) | What the customer or the shop uploaded |
| RTA or Demand PDF (under Appraisal Case) | Your RTA or demand |
What each PDF is
Three PDFs pdrOS makes for you (your report and their report are in Docs too, as Shop Estimate and Supplement #1 Estimate):
- The signup sheet (Docs: Customer Signup Form; its address is also in Customer Signup Form PDF, folder FORM | Customer Signup): made within a minute of the signup. It shows the appraisal fields (type, RO number, vehicle, insurer, claim side, date of loss, carrier's offer, consent) with your logo.
- The signed agreement (Docs: Repair Authorization Form; its address is also in Repair Authorization Form PDF, folder FORM | Repair Authorization): made when the customer signs. It has the wording for that case type, the VIN and vehicle, and their signature.
- The photo report (Docs: Scope Sheet Images (PDF) and (HTML); its address is also in Damage Images PDF, folder Pics To Email PDF, and as a web page in Damage Images HTML, folder Pics To Email HTML): built from the customer's phone photos.
What the customer or shop uploads
The customer sends files through the upload link pdrOS texts them. The files land in four upload fields in folder CASE: Carrier valuation report, Repair invoice, Shop estimate PDF and Carrier estimate PDF. To open one: the Docs button (above, under Appraisal Case), or, when you are already on the contact profile, open folder CASE and click the file's name in the field. A file in the "wrong" box still counts on a total loss.
The customer's photos go into the photo report (above).
What you upload
- Your report or rewrite: Upload Estimate Doc Here ⚡ (folder Estimates).
- The RTA or demand: RTA or demand PDF (folder CASE).
- Their report: Supplement #1 Upload Doc Here ⚡ (folder Supplements).
To upload:
- In the left menu, click Contacts.
- Click in the search box at the top of the list and type the customer's last name or RO number.
- Click the customer's name in the list. Their contact profile opens. You are in the right place when you see the customer's name at the top left and their texts in the middle.
- On the left side of the contact profile, scroll down to the folder named in the list above (Estimates, CASE or Supplements) and click the folder's name to open it.
- In the field from the list, click Click to upload, pick the PDF on your computer and click Open.
- Click the blue Save button at the bottom of the left side.
- On the far right edge of the contact profile, click the Notes icon (a pen). Within two minutes, the newest note at the top tells you what pdrOS did with the file.
To open a file you or the customer uploaded: same route to the folder, then click the file's name in the field.
Forms / Pics: another way to the same three PDFs
If the Docs window is ever empty or slow, the signed agreement, the signup sheet and the photo report are also here:
- In the left menu, click Forms / Pics.
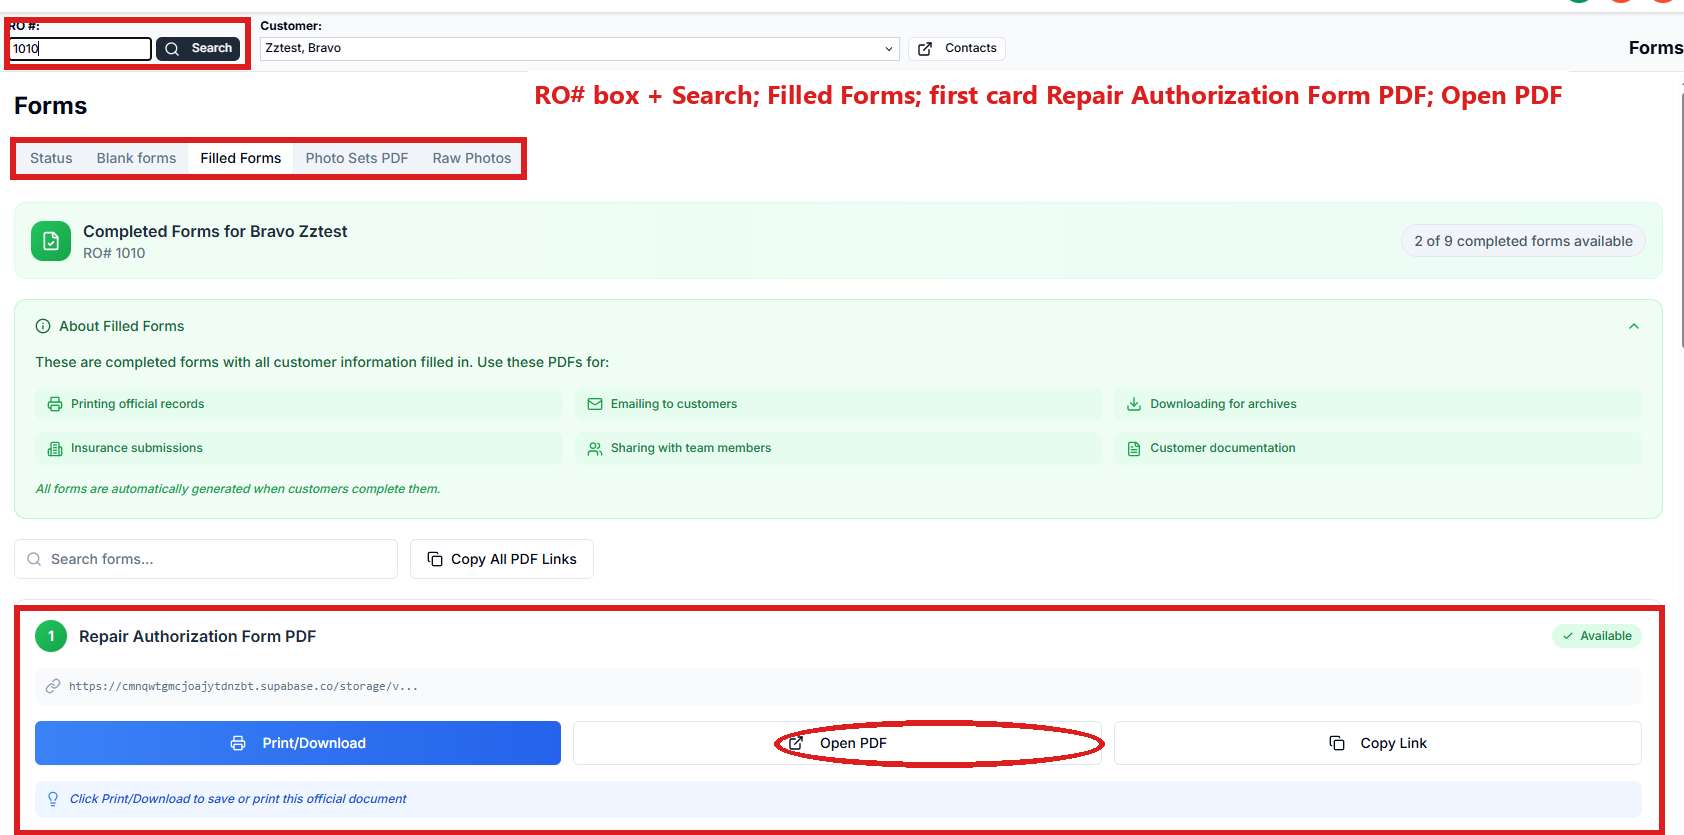
- Click in the box under RO #: at the top (it reads Enter repair order number), type the RO number (your case number) and click Search.
- Click the tab you need:
- Filled Forms for the signed agreement (the card Repair Authorization Form PDF, the first card) and the signup sheet (the card Customer Signup Form PDF, further down the list);
- Photo Sets PDF for the customer's photo report (the card Scope Sheet Images).
- On the card, click Open PDF (the cards further down are for repair shops; ignore them). The PDF opens in a new browser tab. (Print/Download saves it to your computer; Copy Link copies its web address.)
You are in the right place when the customer's name shows at the top and you see the tabs Status, Blank forms, Filled Forms and Photo Sets PDF.
The Documents icon: every file in one list
- In the left menu, click Contacts.
- Click in the search box at the top of the list and type the customer's last name or RO number.
- Click the customer's name in the list. Their contact profile opens. You are in the right place when you see the customer's name at the top left and their texts in the middle.
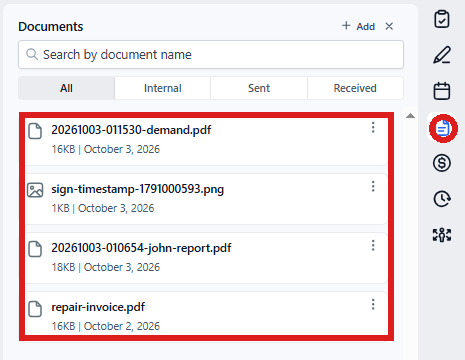
- On the far right edge of the contact profile, click the Documents icon (a page). Every file on this customer is listed with its date.
- Click a file to open it.
Links the system sends
The customer's upload link, agreement link and booking link are theirs alone (they carry their RO number). Two of them are also on the contact profile: REPAIR AUTHORIZATION LINK (folder FORM LINKS, the agreement link) and Appraisal Document Upload Link (folder CARRIER & APPRAISER). The booking link is only in the customer's texts and emails. Never forward one customer's link to another customer.
Did this page not match what you see? Ask the support chat or open a support ticket. We change the page, not you.