For Sharon: your part
Answers: what is Sharon's job in pdrOS? which tasks are hers? what does she click for each one? what does she not touch?
Sharon, your work in pdrOS is the Tasks page. A task appears when a customer or a case needs the office. You read it, do the one thing it says, and click Mark Complete.
Your login and your list
You sign in at app.bc3d.agency in your web browser, with your own email and password. In the left menu, click Tasks. My Tasks opens with your tasks. If you also see a tab All Tasks (Admin), it shows John's tasks too; stay on My Tasks.
Texts about your tasks come to the office phone (your cell; we set it on day one).
Your loop
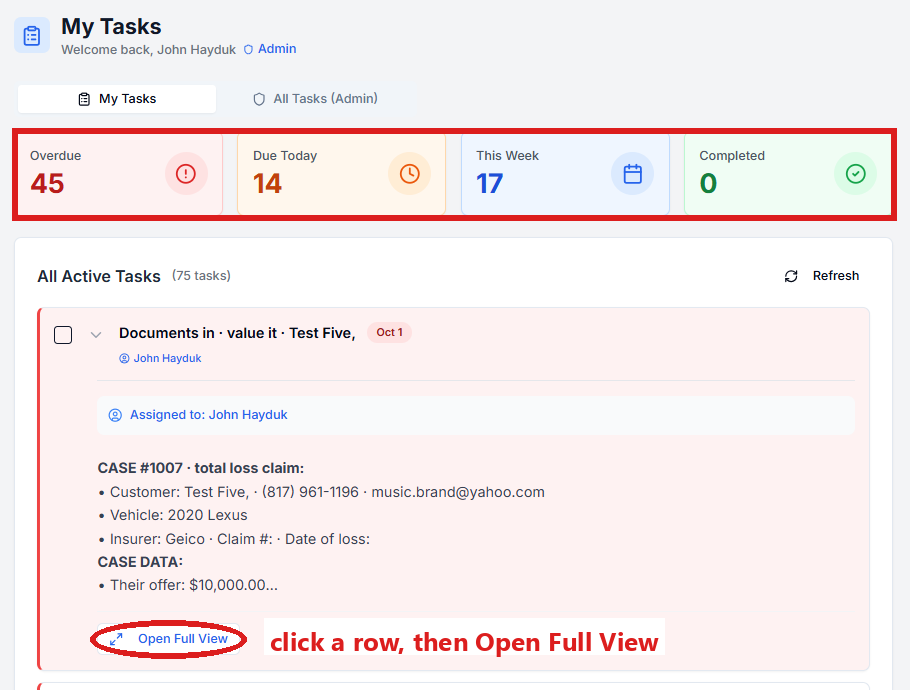
- In the left menu, click Tasks. My Tasks opens. You are in the right place when you see the four boxes Overdue, Due Today, This Week and Completed at the top.
- Click a box to see those tasks.
- Click the task's row. A short preview opens under it.
- Click Open Full View. Read the task: the customer, the facts, and DO THIS.
- Click the link under WHERE (in most of your tasks it follows the words "Conversation and case"; in the CCC1 task it follows "Open the case"). The customer's contact profile opens in a new browser tab. You are in the right place when you see the customer's name at the top left and their texts in the middle.
- Do the step. Your tasks are below, each with its clicks.
- If you changed a field, click the blue Save button at the bottom of the left side.
- Click the browser tab with the Tasks page.
- Click the green Mark Complete button at the bottom right of the full view.
- Click Close to go back to the list.
If the task is already gone when you come back, pdrOS closed it because the step happened. When a task says "Tick this task", it means: click Mark Complete.
If you change a field and no blue Save button appears at the bottom of the left side, stop and tell us. Auto-Save has been switched on, and we switch it back. Never click Enable auto-save (it is under the three dots next to the blue Save button). Some tasks say "green Save button"; they mean this blue one.
Your tasks, click by click
Every task below, except the CCC1 one, starts with steps 1 to 5 of the loop above and ends with steps 8 to 10.
The list with what each task means: The tasks you will see.
Enter the shop's estimate in CCC1 · NAME
On a short pay, when both estimates are in. The files are in the task. Short pay
- In the left menu, click Tasks.
- Click the task's row. A short preview opens under it.
- Click Open Full View.
- In the task, click the link to the shop's estimate. The file opens.
- Enter the shop's estimate in CCC1.
- Click the browser tab with the Tasks page.
- Click the green Mark Complete button at the bottom right of the full view.
The same two files are also on the customer's contact profile. Click the link under WHERE. On the left side, scroll down to the folder CASE and click the folder's name to open it. Click the file's name in Shop estimate PDF or Carrier estimate PDF.
Customer has a money question · NAME
The fee, or how to pay. Never a figure about the claim (the offer, John's number, the award, the net). For those, tell the customer John will come back to them, and tell John.
In the left menu, click Tasks. Click the task's row, then Open Full View. Click the link under WHERE. Then:
- In the middle of the contact profile, read their last few messages (newest at the bottom). What exactly are they asking?
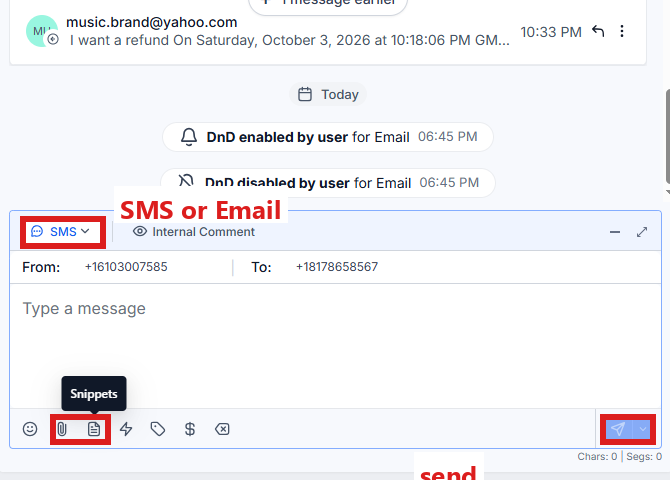
- At the bottom of the middle is the message box. At its left end, click the small button with a down arrow and pick SMS (or Email if they emailed).
- Click in the box and type your answer. The fee answer is in the task.
- Click the paper-plane button at the right end to send.
- On the far right edge of the contact profile, click the Notes icon (it looks like a pen; hold the mouse over the icons to see their names).
- Click + Add at the top of the notes.
- Type a title and the note: the question and what you answered.
- Click Save under the note you typed. (The blue Save button at the bottom of the left side is only for fields.)
Then click the browser tab with the Tasks page and click the green Mark Complete button at the bottom right of the full view.
Customer wants a date or an update · NAME
Tell them the next step from Case status (folder CASE). Never promise a settlement date.
In the left menu, click Tasks. Click the task's row, then Open Full View. Click the link under WHERE. Then:
- In the middle of the contact profile, read their last few messages.
- On the left side of the contact profile, scroll down to the folder CASE and click the folder's name to open it.
- Read Case status: one plain sentence on where the case stands. (The task shows it too.)
- At the bottom of the middle is the message box. At its left end, click the small button with a down arrow and pick SMS (or Email if they emailed).
- Click in the box and type the next step and who it waits on.
- Click the paper-plane button at the right end to send.
- On the far right edge of the contact profile, click the Notes icon (a pen).
- Click + Add at the top of the notes.
- Type a title and the note: what you told them.
- Click Save under the note you typed. (The blue Save button at the bottom of the left side is only for fields.)
Then click the browser tab with the Tasks page and click the green Mark Complete button at the bottom right of the full view.
Customer gave new contact or case details · NAME
Update the contact profile within the hour. Where each new detail goes, on the left side of the contact profile:
- A new phone or email: folder Contact → Phone, Email.
- A new address: folder General Info. On a travel inspection, also tell John the new address.
- Claim # or Insurance Company: folder Insurance Info.
- Adjuster name, Adjuster email, Other appraiser name, Other appraiser email or Other appraiser phone: folder CARRIER & APPRAISER.
In the left menu, click Tasks. Click the task's row, then Open Full View. Click the link under WHERE. Then:
- In the middle of the contact profile, read their last few messages. Note the new details exactly as they wrote them.
- On the left side of the contact profile, scroll down to the folder from the list above and click the folder's name to open it.
- Click in the box that holds the old detail and delete it.
- Type the new detail. Check the spelling of any email: pdrOS sends the demand and the chases to it.
- Click the blue Save button at the bottom of the left side.
- At the bottom of the middle is the message box. At its left end, click the small button with a down arrow and pick SMS.
- Click in the box and type: "Thank you, I have updated your [phone/email/address]; you will get our updates there from now on."
- Click the paper-plane button at the right end to send.
- On the far right edge of the contact profile, click the Notes icon (a pen).
- Click + Add at the top of the notes.
- Type a title and the note: what changed, old and new.
- Click Save under the note you typed. (The blue Save button at the bottom of the left side is only for fields.)
Then click the browser tab with the Tasks page and click the green Mark Complete button at the bottom right of the full view.
Customer asked for a document · NAME
They want a copy of the agreement, John's report or the settlement summary. Anything about the other side's report or figures: John decides what is shared; ask him.
Where each one is:
- The signed agreement: in the left menu, Forms / Pics → the customer by RO number → Filled Forms → the card Repair Authorization Form PDF → Open PDF.
- John's report: on the contact profile, folder Estimates, the file in Upload Estimate Doc Here (click its name).
- The settlement summary is an email, not a file. It went on the date in Settlement summary sent date (folder OUTCOME).
To send the agreement, get the PDF first: in the left menu, click Forms / Pics. Click in the box under RO #: at the top (it reads Enter repair order number), type the RO number and click Search. Click the tab Filled Forms. On the first card, Repair Authorization Form PDF, click Print/Download and save the PDF to your computer.
Then: in the left menu, click Tasks. Click the task's row, then Open Full View. Click the link under WHERE. Then:
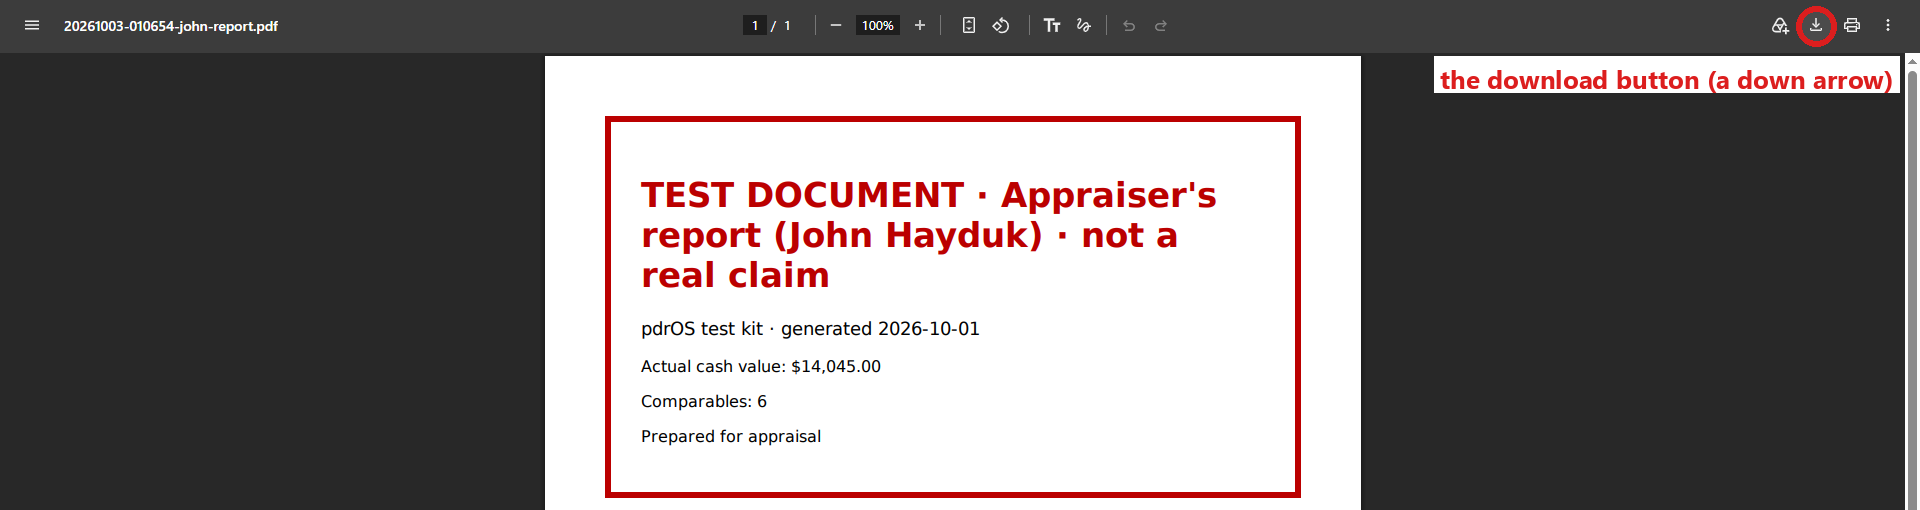
- For John's report (skip this step for the agreement): on the left side of the contact profile, scroll down to the folder Estimates and click the folder's name to open it. Click the file's name in Upload Estimate Doc Here; the PDF opens in a new browser tab. Save it with the browser's download button (a down arrow at the top of the PDF).
- Click the browser tab with the contact profile.
- Check that you are on the right customer: their name is at the top left.
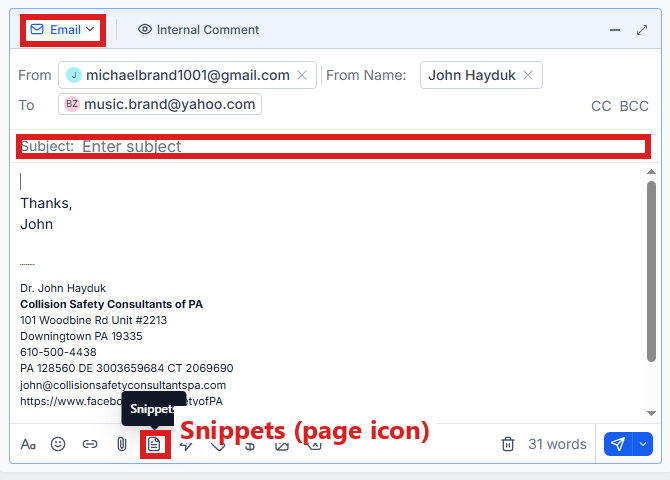
- At the bottom of the middle is the message box. At its left end, click the small button with a down arrow and pick Email.
- The box grows to show the subject line. Click in the subject line and type a subject.
- Click in the box and type a short message.
- Click the paperclip icon and pick the PDF you saved.
- Click the paper-plane button at the right end to send.
To send the settlement summary again:
- On the left side of the contact profile, scroll down to the folder OUTCOME and click the folder's name to open it.
- Read the date in Settlement summary sent date.
- In the middle of the contact profile, scroll up to that date.
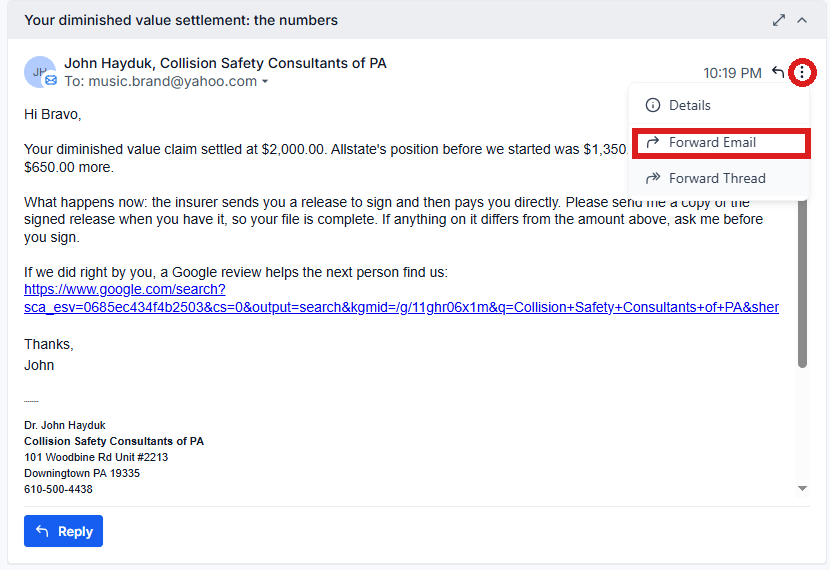
- Click the settlement summary email. It opens in full.
- Click the three dots at the top right of the email and pick Forward Email.
- Check that the customer's email is in the To box, then click the paper-plane button to send.
Then add a note of what you sent:
- On the far right edge of the contact profile, click the Notes icon (a pen).
- Click + Add at the top of the notes.
- Type a title and the note: what you sent.
- Click Save under the note you typed. (The blue Save button at the bottom of the left side is only for fields.)
Then click the browser tab with the Tasks page and click the green Mark Complete button at the bottom right of the full view.
URGENT · unhappy customer · call within the hour · NAME
Call within the hour, by phone, not by text.
In the left menu, click Tasks. Click the task's row, then Open Full View. Click the link under WHERE. Then:
- In the middle of the contact profile, read the conversation. What went wrong?
- On the far right edge of the contact profile, click the Notes icon (a pen) and read the notes.
- The task asks you to switch Sarah off for this customer while you handle it. Her switch is not on your screen, so tell us: in the left menu, click Support, then the orange Support Ticket button, with the customer's name and "please switch Sarah off". We do it within the hour, and switch her back on when you say.
- Call them by phone. If you cannot fix it, tell John today.
- In the notes, click + Add at the top.
- Type a title and the note: when you called, the issue, what you promised.
- Click Save under the note you typed. (The blue Save button at the bottom of the left side is only for fields.)
This task's own words say: mark it complete only when the customer says they are satisfied. Then tell us (in the left menu, click Support, then the orange Support Ticket button) to switch Sarah back on. More on Sarah: Sarah.
Sarah needs a person · NAME
Most often to move or cancel an inspection. Read first; do nothing until you know exactly what they want.
In the left menu, click Tasks. Click the task's row, then Open Full View. Click the link under WHERE. Then:
- In the middle of the contact profile, read the whole conversation. Say in one line what they want.
- If it is not clear, ask them in the message box and wait for the answer.
- On the far right edge of the contact profile, click the Appointments icon (a calendar). You are in the right place when the panel's title reads Appointments.
To cancel the inspection:
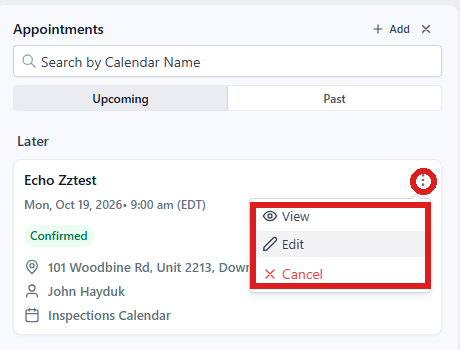
- Click the three dots at the right of the appointment and pick Cancel.
pdrOS texts the customer a link to pick a new time, and tells John.
To move the inspection:
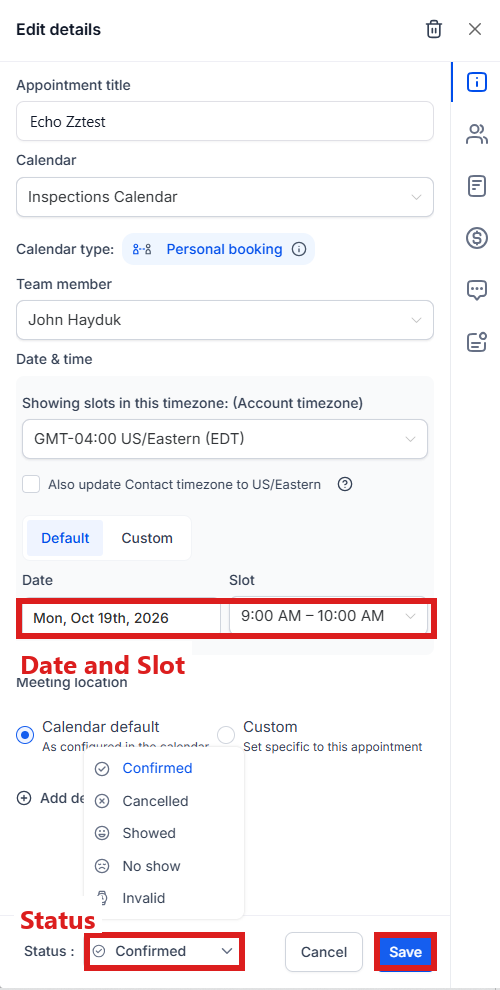
- Click the three dots at the right of the appointment and pick Edit. The Edit details panel opens.
- Under Date & time, click Date and pick the new day, then click Slot and pick the new time.
- Click Save at the bottom right of the panel.
pdrOS sends the customer the new confirmation. Never type a new name into the calendar.
Anything else: answer it in the message box, or hand it to John with a note.
Then add a note of what they wanted and what you did:
- On the far right edge of the contact profile, click the Notes icon (a pen).
- Click + Add at the top of the notes.
- Type a title and the note.
- Click Save under the note you typed. (The blue Save button at the bottom of the left side is only for fields.)
Then click the browser tab with the Tasks page and click the green Mark Complete button at the bottom right of the full view.
Sarah handover · NAME
Sarah stopped answering this customer for 8 hours. John has a one-line User query task with what they asked.
In the left menu, click Tasks. Click the task's row, then Open Full View. Click the link under WHERE. Then:
- In the middle of the contact profile, read the conversation.
- Agree with John which of you replies.
- To reply: at the bottom of the middle is the message box. At its left end, click the small button with a down arrow and pick SMS.
- Click in the box and type your reply.
- Click the paper-plane button at the right end to send.
Then click the browser tab with the Tasks page and click the green Mark Complete button at the bottom right of the full view.
Without a task
Book, move or cancel an inspection when a customer asks
Book only from the customer's contact profile. Never type a new name into the calendar. Booking the visit
- In the left menu, click Contacts.
- Click in the search box at the top of the list and type the customer's last name or RO number (your case number).
- Click the customer's name in the list. Their contact profile opens. You are in the right place when you see the customer's name at the top left and their texts in the middle.
- On the far right edge of the contact profile, click the Appointments icon (a calendar). You are in the right place when the panel's title reads Appointments.
To book:
- Click + Add at the top of the panel. A small menu opens; click Meetings. The Book appointment window opens.
- Under Calendar, make sure it reads Inspections Calendar (if not, click the box and pick it).
- Under Date & time, click the box under Date and pick the day, then the box under Slot and pick a free time.
- Click the blue Book appointment button at the bottom right.
To move:
- Click the three dots at the right of the appointment and pick Edit. The Edit details panel opens.
- Under Date & time, click Date and pick the new day, then click Slot and pick the new time.
- Click Save at the bottom right of the panel.
To cancel, or to mark a no show:
- To cancel: click the three dots at the right of the appointment and pick Cancel.
To mark a no show instead:
- Click the three dots at the right of the appointment and pick Edit. The Edit details panel opens.
- At the bottom of the panel, click the box next to Status and pick No show.
- Click Save at the bottom right.
Reply to a customer when a task asks you to
The customer's thread has more on this.
- In the left menu, click Contacts.
- Click in the search box at the top of the list and type the customer's last name or RO number.
- Click the customer's name in the list. Their contact profile opens. You are in the right place when you see the customer's name at the top left and their texts in the middle.
- At the bottom of the middle is the message box. At its left end, click the small button with a down arrow and pick SMS for a text or Email for an email.
- Click in the box and type. Keep a text under 320 characters, and put a link in a text of its own.
- Click the paper-plane button at the right end to send.
Add a note after a call
What was said, what you promised. Notes, Tasks and Appointments
- In the left menu, click Contacts.
- Click in the search box at the top of the list and type the customer's last name or RO number.
- Click the customer's name in the list. Their contact profile opens. You are in the right place when you see the customer's name at the top left and their texts in the middle.
- On the far right edge of the contact profile, click the Notes icon (it looks like a pen; hold the mouse over the icons to see their names).
- Click + Add at the top of the notes.
- Type a title and the note.
- Click Save under the note you typed. (The blue Save button at the bottom of the left side is only for fields.)
What you do not do
- You do not set the Send switches or type figures (My number, Counteroffer, Award amount). Those are John's.
- You do not change the calendar's hours or settings.
- You do not give a customer a dollar figure about their claim. Say John will come back to them, and tell John.
If something looks wrong
If a customer insists on a figure, then do not guess. Say you will have John call them today, and tell John.
Did this page not match what you see? Ask the support chat or open a support ticket. We change the page, not you.